Category: Water Testing

  • How Long Can You Store Water? An Installer’s Honest Answer

    How Long Can You Store Water? An Installer’s Honest Answer

    Water itself does not expire. Chemically speaking, H₂O doesn’t rot, spoil, or break down over time.

    When stored water goes bad, it happens for four specific reasons: microbial growth, chemicals migrating out of an unsuitable container, contamination introduced through openings or dirty equipment, and the loss of disinfectant residual over time.

    Understanding how to control these four factors determines whether your stored water stays clean or turns into a hazard.

    Storage Containers: Getting the Foundation Right

    Your water is only as safe as the vessel holding it.

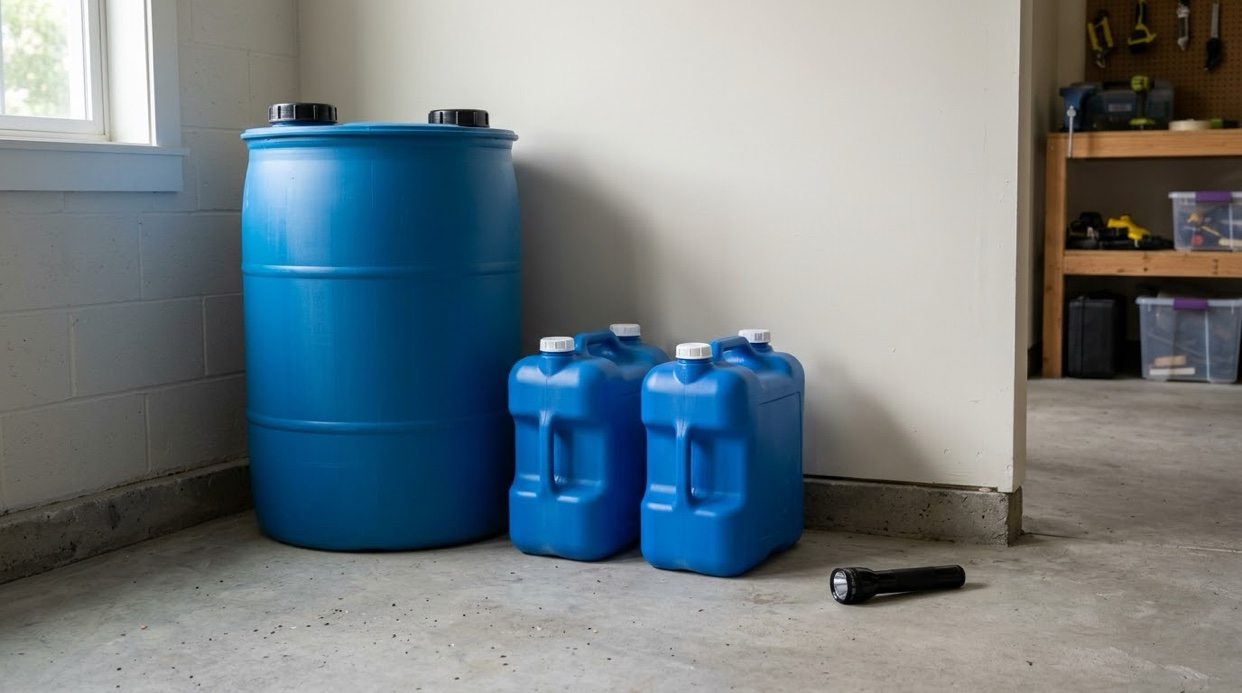
    • Food-Grade Verification: Use food-grade containers confirmed food-grade by the manufacturer. A recycling #2 stamp alone does not prove food-grade status, though HDPE #2 is the standard drum resin.
    • Light and Opacity: Keep stored water out of direct sunlight. Using opaque containers helps prevent light from fueling microbial issues.
    • Prohibited Containers: Never use a container that held detergent, pesticides, petroleum, or other toxic chemicals. Never use a used barrel or IBC tote unless you know exactly what was in it.
    • Design and Sanitation: Choose containers featuring a tight-fitting lid and a narrow opening. Always clean and sanitize the container before filling it.
    • Environment: Store your containers cool — ideally 50 to 70 degrees F — and away from any toxic substances stored nearby.

    Water Rotation Schedules

    The CDC recommends replacing self-filled stored water every 6 months. That is a freshness and reliability standard designed to ensure your supply remains safe and clear of contamination.

    The 6-month rotation timeframe is a recommendation, not a sudden cliff where water turns dangerous on day 181. For commercially bottled water, simply follow its labeled expiration or use-by date.

    Emergency Disinfection Standards

    If you must treat questionable water in an emergency, use regular, unscented liquid household chlorine bleach — no added cleaners or fragrances — and follow the EPA/CDC instructions for the particular product.

    • Clear Water Dosage: Add 8 drops of 6% sodium hypochlorite bleach per gallon of clear water. If using 8.25% bleach, add 6 drops per gallon.
    • Strengths Vary: Bleach is not one strength. Older bottles are 5.25%, most regular bleach today is 6%, and concentrated bleach runs 7.5% to 8.25%. The doses above are the EPA’s published points for 6% and 8.25% — whatever percentage your bottle’s label states is the one that governs.
    • Pool Chlorine: Pool chlorine is stronger — liquid runs 10% to 12.5% — but it is not the bottle for this job; it isn’t labeled for drinking water.
    • Since People Ask — the Stipulations: Liquid pool chlorine is the same chemical as bleach at roughly double strength, but (1) only a jug of plain sodium hypochlorite with no additives — no algaecides, clarifiers, or copper compounds — is even a candidate; (2) no agency publishes a dose for it, so any dose is proportion guesswork, and a mistake at double strength is a doubled mistake; and (3) an opened jug loses strength fast, so the label’s percentage may no longer be true. That is why the official word is household bleach, and pool chlorine stays an improvisation, not a method. Pool shock is calcium hypochlorite — a different chemical and procedure altogether.
    • Process: Stir the mixture thoroughly and let it stand for 30 minutes.
    • Verification: Check for a slight chlorine odor. If you do not smell chlorine, repeat the dosage and wait another 15 minutes.
    • Important Note: This disinfection process is an emergency treatment for questionable water, not a routine step required for clean city water.
    • Bleach Degradation: Keep in mind that household bleach loses its potency over months once opened, so always dose with fresh bleach.

    Hydrogen Peroxide Is Not a Water Disinfectant

    Neither the EPA nor the CDC recommends household 3% hydrogen peroxide for disinfecting drinking water at any drop dose. It does not provide reliable long-term residual protection.

    Commercial Water Preservers

    Commercial water preservers are stabilized sodium hypochlorite formulations EPA-registered for 5-year stored-water use. They are neither magic nor a scam. When evaluating them against standard bleach, compare their active ingredient, EPA registration, specific directions, and overall cost per gallon over time. And read the label: an EPA registration is not a guarantee that every product performs identically, and a five-year claim holds only under the product’s labeled storage conditions.

    The Look-and-Smell Test Does Not Exist

    Disease-causing microorganisms generally cannot be detected by sight, smell, or taste. Water can look perfectly clear and have no unusual odor while still containing harmful pathogens.

    An anecdote about someone drinking old stored water without becoming ill is not evidence of safety. You cannot establish microbiological safety by looking at, smelling, or tasting water.

    Understanding Legionella

    Legionella bacteria grow in warm, stagnant water, particularly around 77 to 113 degrees F. They are commonly associated with showers, hot tubs, cooling towers, and plumbing systems.

    People primarily become infected by inhaling contaminated water droplets. Aspiration of contaminated water is another possible route, but simply drinking water is not the typical transmission pathway.

    The storage lesson is straightforward: keep stored water cool, sealed, and properly maintained.

    Fixing Flat Taste

    Stored water often tastes flat because it has lost dissolved air.

    • Aeration: Pour the water back and forth between two clean containers and let it stand. Aeration improves taste only; it is not a treatment method.
    • Boiled Water: If water was boiled, a pinch of salt per quart improves the flavor. A taste tip only — it does nothing for safety.

    How Much Water to Store

    • Baseline: Store at least 1 gallon per person per day.
    • Duration: The CDC floor is a 3-day supply, but aim for 2 weeks if space allows.
    • Adjustments: Store more for extreme heat, illness, pregnancy, pets, and basic hygiene needs.

    Facts first, then filter. — Steve
  • The Running Toilet: How a Worn Flapper Can Waste 200 Gallons a Day

    The Running Toilet: How a Worn Flapper Can Waste 200 Gallons a Day

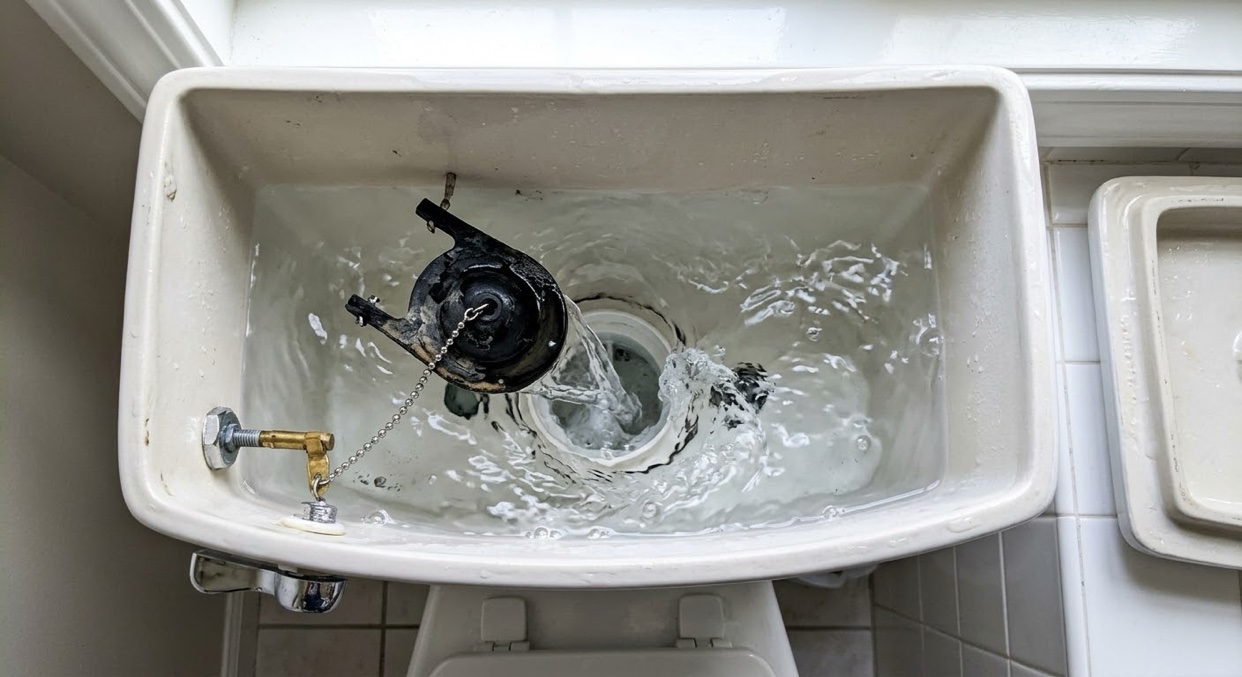
    There is a stealthy little water thief hiding in plain sight in most homes, and chances are good it is working right now without making a sound. It is your toilet’s flapper valve — the rubber disc at the bottom of the tank that lifts when you flush and drops back down to hold the water in place.

    Over time, exposure to common disinfectants like chlorine and chloramines, along with natural mineral deposits, causes that rubber to warp, harden, or degrade. When it loses its seal, water quietly slips past it from the tank down into the bowl. Because it happens below the waterline, you won’t see a puddle on the bathroom floor. But the EPA’s WaterSense program puts a running toilet at 200 gallons of water a day or more — 73,000 gallons over a year — adding up to hundreds of dollars in unnecessary water and sewer costs before most people ever notice.

    The good news is that diagnosing and fixing this silent leak requires no special plumbing skills, no expensive service calls, and about ten minutes of your time.

    Three Ways to Check for a Flapper Leak

    Before you pull out any tools, you can easily confirm whether your toilet is leaking using one of these three diagnostic methods:

    The Listen Test

    Stand quietly in your bathroom when the house is still. If you hear the toilet tank refilling on its own every few minutes — even when nobody has flushed — water is escaping through the flapper and dropping the tank level until the fill valve kicks back on.

    The Food-Coloring Dye Test

    Remove the lid from your toilet tank. Drop a few drops of dark food coloring (or a dye tablet) directly into the water until the tank turns a distinct color. Do not flush. Wait about 10 to 15 minutes, then look inside the toilet bowl. If colored water has seeped down into the bowl without anyone touching the handle, your flapper is failing to seal. (Flush right after the test so the dye doesn’t stain.)

    The Water Meter Test

    Go out to your main water meter box. Make sure every faucet, appliance, and outdoor spigot in the house is turned completely off. Look closely at the meter dial; most meters feature a small, low-flow indicator — a little triangle or gear. If that indicator is spinning or ticking upward even slightly, water is moving somewhere in your home, and a running toilet is one of the most common culprits.

    How to Replace a Flapper in 10 Minutes (No Tools Required)

    Once you’ve confirmed the leak, replacing the flapper is a straightforward DIY project that doesn’t even require a wrench.

    • Shut off the water supply: Turn the small oval-shaped valve located on the wall behind your toilet clockwise until it stops. This prevents the tank from continually refilling while you work.
    • Drain the tank: Flush the toilet to empty most of the water out of the tank. Hold the handle down for a few extra seconds to drain as much as possible. Absorb any remaining puddles at the bottom with an old sponge or towel.
    • Unhook the old flapper: Reach into the tank and disconnect the small chain from the toilet flush lever arm. Next, slide the rubber “ears” or ring of the flapper off the mounting pegs located on either side of the overflow tube.
    • Attach the new flapper: Take your replacement flapper and slide its mounting loops over the overflow tube pegs. One caution before you buy: most standard toilets use a 2-inch flapper, but many newer toilets use a 3-inch one — check the size of the old flapper first so you only make one trip to the store. Hook the chain onto the flush lever arm, making sure there is just a little slack — about half an inch — so the flapper can sit completely flat against the drain opening when closed.
    • Restore water and test: Turn the wall water supply valve counterclockwise to reopen it. Allow the tank to fill back up, then test-flush a couple of times to ensure the chain isn’t catching and the seal is tight.

    One last habit worth starting: flappers are a wear part, not a lifetime part. WaterSense guidance points to replacing them about every five years, before the silent leak starts — a universal flapper costs about $6, which is a lot cheaper than 73,000 gallons.

    Taking care of a worn flapper protects your municipal water supply, keeps your utility bills predictable, and gives you peace of mind knowing your home’s plumbing is running efficiently.

    Facts first, then filter. — Steve

  • Water Dowsing: The Old Way of Finding Water — and What Science Says About It

    Water Dowsing: The Old Way of Finding Water — and What Science Says About It

    By Steve

    When you spend your life working in water treatment, you get used to looking at water through a microscope or a lab report. You talk about parts per million, total dissolved solids, filter micron ratings, and pipe friction loss. It is a precise world built on chemistry and fluid mechanics.

    But if you spend enough time out in the field — talking to well drillers, farmers, and old-timers who have lived on the same plot of land for generations — you eventually run into a practice that does not fit neatly into a textbook.

    You will see a man step out of a pickup truck holding two thin, L-shaped brass rods, or maybe a Y-shaped fork cut from a peach tree. He will grip them loosely in his hands, hold them straight out in front of his chest, and start walking across a dry pasture. Suddenly, without his hands visibly turning, the two brass rods cross over each other like a pair of scissors.

    He stops, points his boot at the soil, and says, “Dig here.”

    That is water dowsing — sometimes called water witching, divining, or doodlebugging. Depending on who you talk to, it is either an ancient trade tradition, a subconscious skill, or outright nonsense. Having spent my career helping folks understand what is in their water and how it gets to their tap, I have always found the tradition fascinating.

    Here is a plainspoken look at what dowsing is, where it comes from, what science has to say about it, why it has refused to disappear — and how the professionals find water today, when the rods stay in the truck.

    What Is Water Dowsing?

    At its core, dowsing is the practice of using a hand-held tool to locate underground water, minerals, or utilities.

    While some people use pendulum weights or wooden sticks, the most common setup you will see today involves two L-shaped metal rods — usually brass, copper, or steel cut from old coat hangers. The short end of each “L” is held loosely in the hand, often inside a light sleeve or tube so the rod can pivot freely, while the long end points forward.

    The dowser walks slowly across the terrain. When they pass over what they believe is an underground stream or aquifer, the tips of the rods swing inward and cross over one another. Some dowsers claim they can feel a slight magnetic pull; others say their hands get warm or feel a subtle twitching sensation.

    A History Measured in Centuries

    Water witching is not a modern fad. People have been walking fields with sticks for hundreds of years.

    Historical woodcuts and documents show miners and farmers using wooden divining rods across Europe. Originally, the practice was used to locate silver, copper, and iron ore seams deep underground — the oldest written accounts come from German mining country, where the forked rod was a working tool of the ore hunters. Over time, as communities expanded and needed reliable drinking water for livestock and farming, the technique was adapted to find underground water sources.

    When European settlers migrated to North America, they brought the tradition with them. On the American frontier, finding a good spot to dig a well was a matter of survival. Drilling equipment was rudimentary, costly, and backbreaking to move. Calling in a local “water witch” was often the very first step a homebuilder took before breaking ground.

    Who Still Uses It Today?

    You might assume that dowsing disappeared with the invention of modern geology, satellite imaging, and electrical resistivity testing. But if you talk to people who work outdoors for a living, you will find it is still surprisingly common.

    • Well Drillers: Plenty of commercial well drillers — even those with modern rigs worth hundreds of thousands of dollars — keep a pair of brass rods behind the seat of their truck. Some use them before setting up their rig; others will offer to dowse a spot if a landowner asks where to drill.
    • Farmers and Ranchers: When you need to sink a borehole across hundreds of acres of pasture, calling out a local dowser is still a common neighborhood tradition in many rural communities.
    • Utility Crews: Interestingly, even some municipal water department workers and underground line locators have been known to pull out a set of rods when looking for buried iron pipes or water mains.

    Whether they view it as a trusted method or just a fun secondary check, plenty of practical, field-tested workers still carry the rods.

    What Does Science Say?

    If you ask a scientist or a government agency about dowsing, you will get a very straightforward answer: there is no scientific evidence that dowsing works.

    The U.S. Geological Survey (USGS), which studies the distribution and quality of water across the nation, maintains an official position on water witching. They state clearly that the practice is scientifically unproven. According to geologists, water is present almost everywhere beneath the Earth’s surface at varying depths in what is known as the water table. In many regions, if you drill deep enough, you will hit water regardless of where you put the hole.

    When scientists put dowsers to controlled testing — placing water pipes underground in hidden locations or burying water-filled containers under wooden boards — dowsers generally perform no better than random guessing.

    So, why do the rods move?

    Science points to a well-understood phenomenon called the ideomotor effect. This is a physical process where a person makes tiny, involuntary muscle movements in response to an expectation or subconscious thought.

    Because the dowsing rods are balanced delicately in the hands, even an imperceptible movement of the wrists or fingers — so slight that the person holding the rods does not even realize they are doing it — causes the long end of the rod to swing dramatically. The rods act as a mechanical amplifier for subtle body twitches.

    Giving the Practitioner Their Due

    It is easy to stop there and dismiss the whole thing as a parlor trick. But if you talk to experienced dowsers with respect, a more interesting picture emerges.

    Many people who dowse successfully are not trying to fool anyone, nor are they foolish. Many of them are seasoned outdoorsmen — farmers, drillers, and land observers who have spent decades studying the terrain.

    Without consciously realizing it, an experienced dowser may be picking up on subtle environmental cues as they walk the property:

    • The way the slope of the land drains surface water.
    • Changes in soil moisture or soil color underfoot.
    • The types of trees and vegetation growing in a specific patch (certain plants thrive only where groundwater is shallow).
    • Knowledge of local geology and existing wells nearby.

    Their brain processes all these physical clues and arrives at a logical conclusion: there is probably water beneath this spot. That subconscious conclusion triggers a microscopic muscle movement in the hands, and the rods cross.

    In this view, the rods are not sensing the water directly through some unknown force. Instead, the rods are simply revealing what the practitioner’s body and experience have already figured out.

    A Measured Conclusion

    In my years in the water industry, I have learned that the world of water is full of quiet wonders — some explained by clear science, and others wrapped in trade tradition.

    When it comes to dowsing, science gives us a clear answer: the rods do not possess physical forces that pull toward underground streams, and controlled tests do not support the claims. Yet, walk into almost any rural township, and you will find someone who can show you three successful wells on their property, all picked by an old man holding a piece of peach wood.

    Whether you believe the rods feel the water, or simply feel the subtle instincts of the man holding them, the practice has survived for centuries because people in the field swear it works. And as long as folks need to draw clean water out of the earth, the old L-rods will likely stay tucked behind the seats of a few pickup trucks.

    The Modern Way: How Hydrogeologists Find Water Today

    So what happens when the job leaves the pasture and goes to the professionals? Modern hydrogeologists rely on a combination of geology, physics, data analysis, and technology to map what lies beneath the surface. Finding water is not about guessing where a hidden “underground river” flows; it is about mapping the layer cake of rock, sand, gravel, and clay that makes up the earth’s crust, to find saturated, permeable formations capable of yielding water.

    Here are the primary tools and methods they use.

    1. Topographic & Geological Mapping

    Before setting foot in the field or hauling in heavy machinery, hydrogeologists start with existing data.

    • Geological Surveys: Scientists analyze local bedrock maps, soil survey reports, and regional cross-sections to understand the underlying rock types (such as porous sandstone vs. dense granite).
    • Existing Well Logs: Neighboring well records — which list the depth, soil layers, and water yields of existing wells in the area — provide a clear picture of local water tables and subsurface geology.
    • Topography & Surface Hydrology: Aerial photography and satellite imagery help identify surface drainage patterns, fault lines, fracture zones, and vegetation shifts that often signal shallow groundwater.

    2. Geophysical Prospecting (Seeing Into the Ground)

    To “see” beneath the soil without digging, hydrogeologists use non-invasive geophysical methods that measure physical properties of the subsurface.

    • Electrical Resistivity: Sending electrical currents into the ground via metal stakes. Water-saturated sand and gravel conducts electricity differently than dense rock or dry clay.
    • Seismic Refraction: Creating small sound waves (using a sledgehammer or a small charge) and timing how fast they travel through ground layers. Sound travels faster through dense rock and saturated soil than through loose, dry dirt.
    • Ground-Penetrating Radar (GPR): Transmitting high-frequency radio pulses into the soil. It detects shallow water tables, soil transitions, and bedrock depth — a shallow tool, and one that struggles in clay soils.
    • Electromagnetic (EM) Surveys: Measuring magnetic fields produced by induced underground currents. Identifies conductive water-bearing zones and changes in soil salinity across large areas.

    3. Exploratory Drilling & Soil Sampling

    Once potential zones are identified on paper and through geophysics, test wells are drilled to confirm the predictions.

    • Borehole Logging: A small probe is lowered down a narrow test hole to measure natural radiation (gamma logging), electrical resistance, or sonic velocity along the entire depth of the hole.
    • Soil & Core Samples: Drillers extract physical soil and rock cores to inspect grain size, porosity (how much water the rock can hold), and permeability (how easily water flows through it).

    4. Pumping Tests & Hydrologic Modeling

    Finding water is only half the battle; knowing if the aquifer can yield enough water sustainably is the other.

    • Aquifer Pumping Tests: Water is pumped out of a test well at a controlled rate for hours or days while monitoring drawdown levels in nearby observation wells. This determines the aquifer’s transmissivity (how freely water flows through it) and storativity (how much water it stores).
    • Computer Modeling: Hydrogeologists plug soil, recharge, and pump test data into 3D computer models to simulate how the aquifer will perform over years of dry spells and heavy pumping.

    Two very different toolboxes, one job: the dowser walks the land reading it with his hands, and the hydrogeologist reads the same land with maps, current, and sound. Both start from the same truth — the water is down there, in the rock, whether the rod crosses or the meter sings. The honest man just wants to know where, and how much, before he digs.

    Prefer the lab-report side of water? Start with How to Spot an Honest Water Treatment Company — then check the pH, then filter.

  • WQA’s Own Numbers Prove It: Consumers Want Education First

    WQA’s Own Numbers Prove It: Consumers Want Education First

    I watched the Water Quality Association’s podcast this week, and I want to talk about what their own numbers say — because they say a lot.

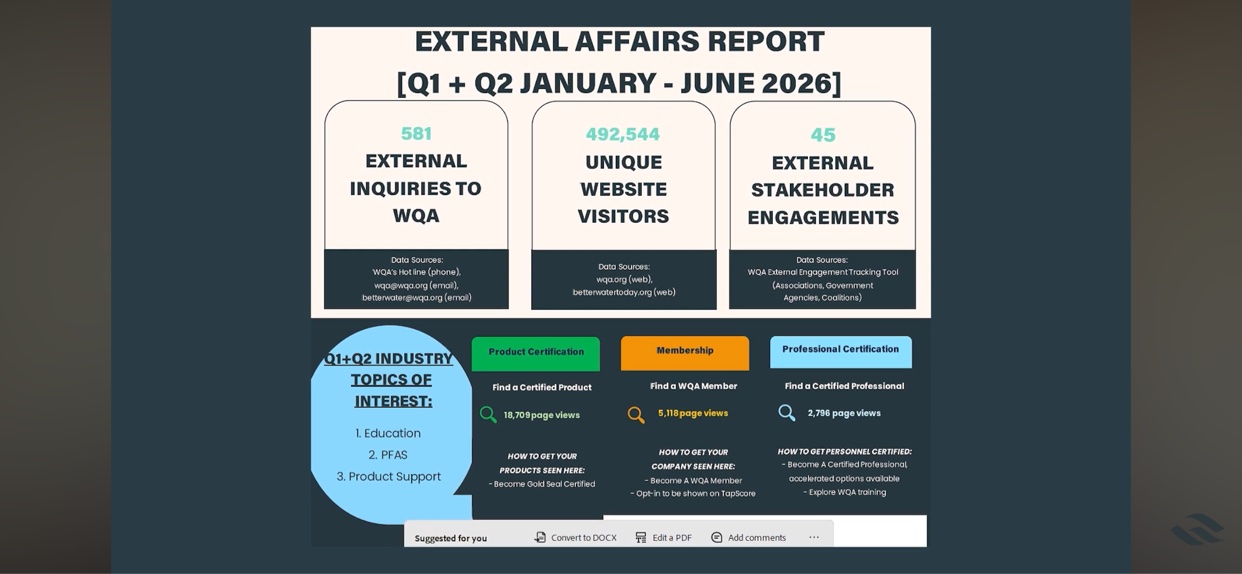
    For the first half of 2026, the WQA reported 492,544 unique visitors to their websites and 581 direct inquiries from the public. And when they listed what people came asking about, the number one topic wasn’t a product. It was education. Number two was PFAS. Number three was product support.

    Education first. That’s the whole idea behind this site.

    I’ve spent my career on the other side of the counter, and I’ll tell you what I told customers for years: learn what’s in your water before anybody sells you anything to fix it. The WQA’s own report says that’s exactly what the public is doing. People aren’t starting with a salesman anymore. They’re starting with questions.

    She also talked about how consumers find their way to the WQA — a lot of them start with a logo on a box, or another company, and go looking to see if the claim is real. That’s the habit I try to teach here: if a box says certified, don’t take the box’s word for it. Look the product up in the certifier’s own directory. 18,709 people viewed the WQA’s certified product search in that same period. I can’t prove my little corner of the internet sent any of them there — but teaching people to check is what I do, and the checking is clearly happening.

    One more thing they said plain, and it matters: the WQA does not recommend specific products. They test, they certify, they list — and then they stop. The picking is left to you. That’s the step I take here: every product in my buyer’s guide got looked up in the certifiers’ own directories before it earned its place. They built the library. Somebody still has to walk you to the right shelf.

    There’s something new in there too. The WQA is putting three doors in front of consumers now: find a certified product, find a member company, and find a certified professional — and member dealers can opt in to be shown on TapScore, a consumer water-testing platform. The trade association is learning what I’ve been saying: consumers want a way in that starts with information, not a sales pitch.

    And learn the difference between their two logos, because some dealers count on you not knowing it: the member logo means a company paid its dues. The Gold Seal means a product was actually tested and certified. Only one of those tells you anything about what’s in the box — and the member logo isn’t even allowed on product packaging.

    They also talked about their code of ethics, which matters to me — my article on spotting an honest water treatment company is built on holding this industry to its own stated standards. And their new slogan is “Creditability in every drop.” Creditability — credibility, being worthy of belief. If it means the industry plans to stand behind what it sells, I’ll take it.

    I was never a WQA member, and they don’t endorse this site — that independence is the point. But understand me: I support them. I support their code of ethics, their certification programs, and what they’re trying to do for this industry. You don’t have to carry a membership card to stand behind doing water right.

    Check the pH, then filter. And before that: learn.

    — Steve

    Video: https://youtu.be/In-UJhpauXM

  • pH in Drinking Water: The 0–14 Scale, Explained

    pH in Drinking Water: The 0–14 Scale, Explained

    pH in Drinking Water: The 0–14 Scale, Explained

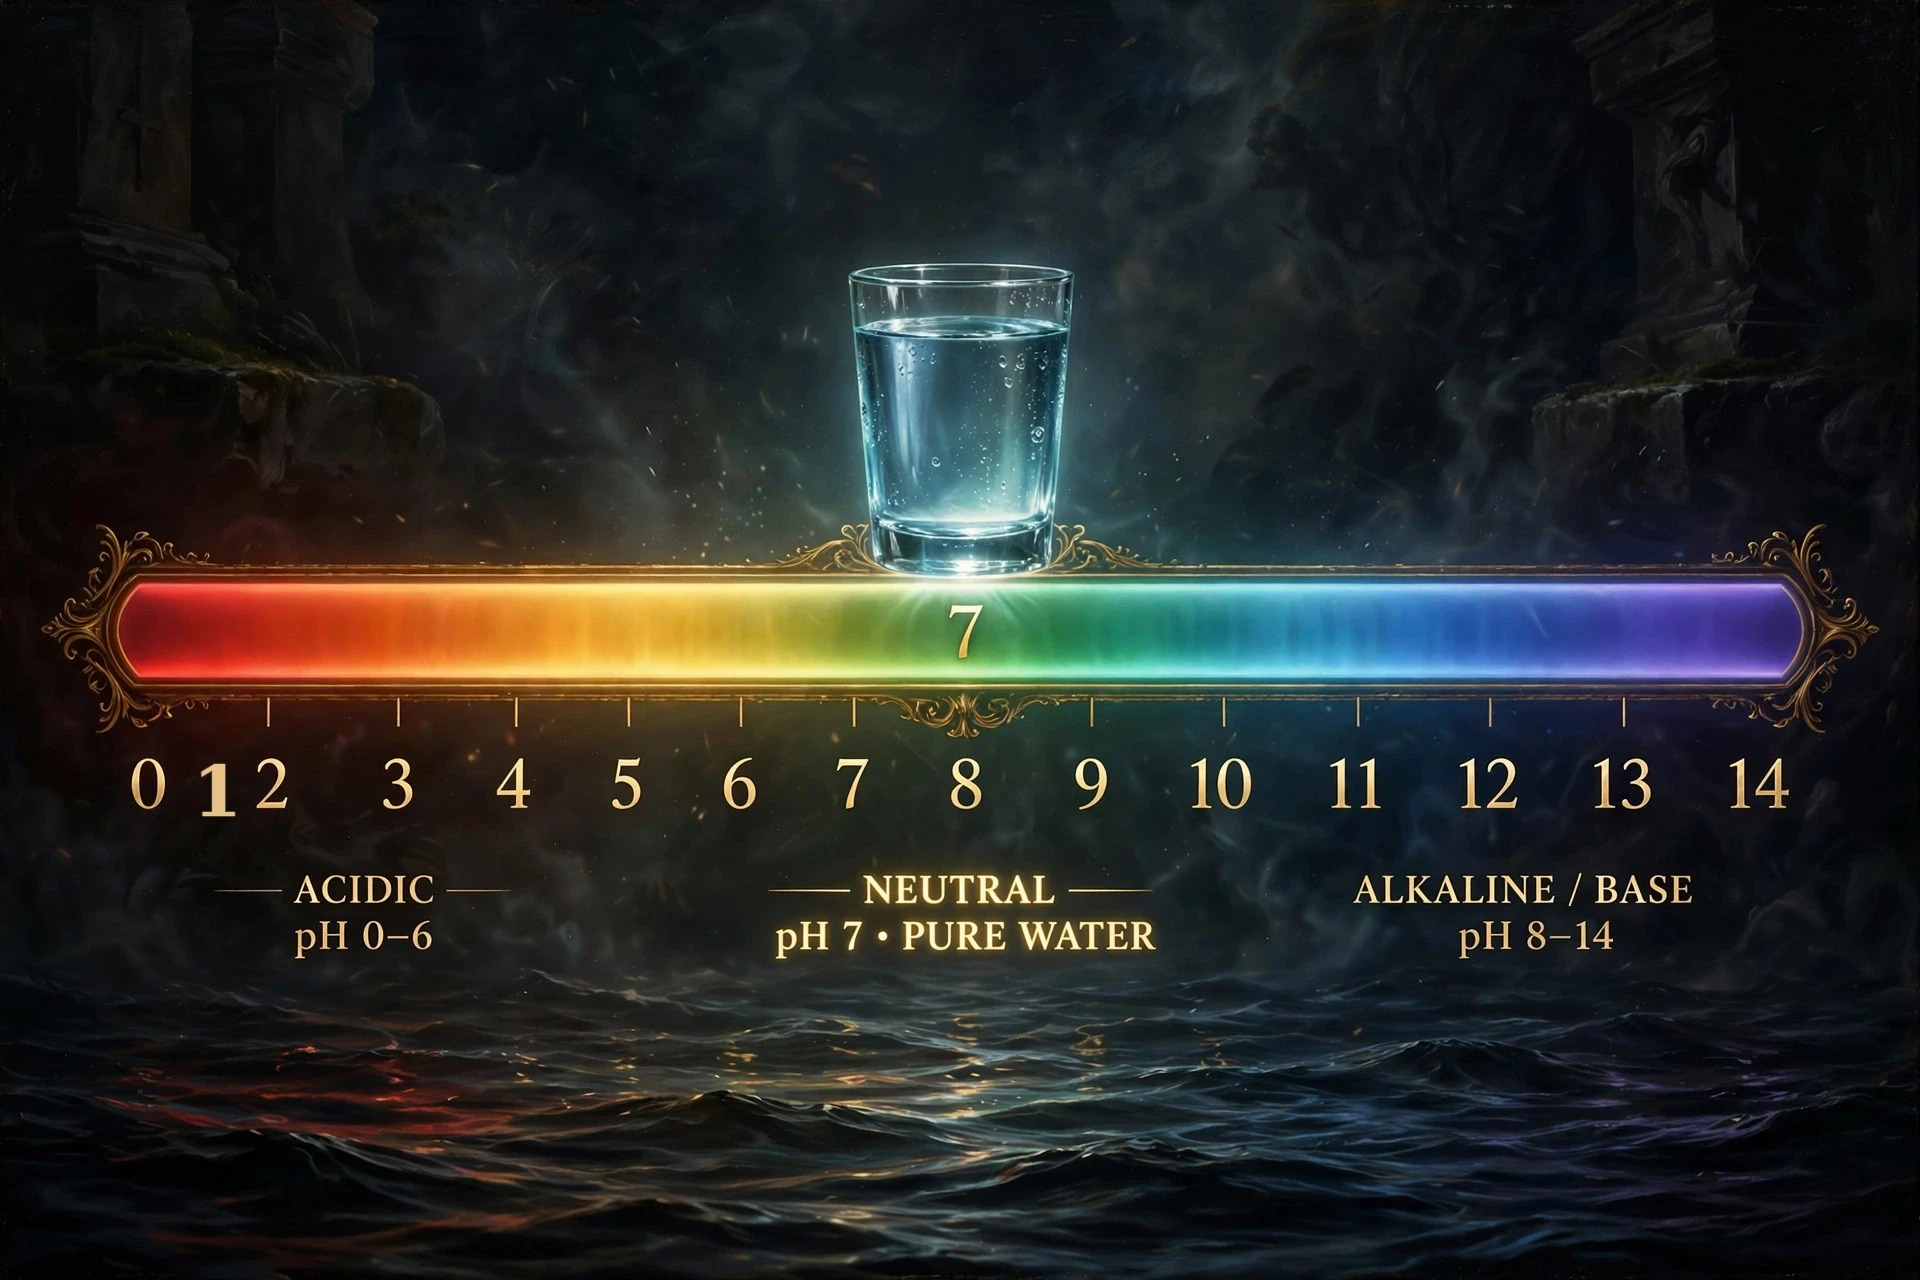
    “Check the pH, then filter.” It’s the first half of how I work — and the part most people skip. pH is just a number from 0 to 14 that tells you how acidic or alkaline your water is. 7 is neutral. Below 7 is acidic. Above 7 is alkaline. That’s the whole scale.

    What the letters mean. pH stands for “potential of hydrogen.” It’s a straight measure of hydrogen ions in the water — more of them, lower the number, more acidic; fewer of them, higher the number, more alkaline.

    Here’s what lives on it:

    The scale, with real examples.

    • 0: Sulfuric acid (battery acid), concentrated hydrochloric acid, aqua regia (nitric + hydrochloric acid — dissolves gold)
    • 1: Hydrochloric acid (stomach acid)
    • 2: Lemon juice (citric acid), lime juice, vinegar (acetic acid), cola (phosphoric acid)
    • 3: Orange juice, grapefruit juice, sports drinks, energy drinks, pickles
    • 4: Tomato juice, beer, wine
    • 5: Black coffee, plain rainwater, bananas
    • 6: Milk (lactic acid), saliva
    • 7: Pure water — neutral; human blood (7.4); heavy water (deuterium oxide — also neutral, its neutral point is 7.4)
    • 8: Seawater, baking soda solution (sodium bicarbonate), eggs
    • 9: Toothpaste, hand soap
    • 10: Milk of magnesia (magnesium hydroxide)
    • 11: Household ammonia (ammonium hydroxide)
    • 12: Bleach (sodium hypochlorite)
    • 13: Oven cleaner (sodium hydroxide)
    • 14: Drain cleaner (lye — concentrated sodium hydroxide)

    Notice how much of everyday life sits between 2 and 9. Your morning coffee is a 5. Your tap water should be near 7 or 8. Anything at the extremes — near 0 or near 14 — will burn you, and that’s the point of the scale: distance from 7 is intensity.

    What it means for YOUR water. The EPA wants drinking water between 6.5 and 8.5. That’s not a health limit — it’s about your pipes and your taste buds. Below 6.5, water turns corrosive: it eats at copper pipes and can pull lead out of old solder and fixtures. That’s the real danger of acidic water — not the pH itself, but what it drags along with it. Above 8.5, you get bitter taste, scale buildup, and chlorine doesn’t disinfect as well.

    How to test. pH test strips are cheap and fine for a rough number. A liquid drop kit is better. A digital pH meter is the best value if you test often. Or just read your utility’s annual water quality report — pH is always on it.

    How to fix it. Acidic water (below 6.5): a calcite neutralizer filter — water flows through crushed limestone that dissolves just enough to bring the pH up. Simple, no electricity, no chemicals to refill. Very acidic well water may need soda ash injection instead. After reverse osmosis: RO strips the minerals out and usually drops the pH, so most under-sink RO systems finish with an alkaline post-filter — a cartridge of calcite, oyster shell media, or a calcite/Corosex blend that puts minerals back in and brings the pH up before the water hits your glass. Alkaline water (above 8.5): most people don’t treat it for drinking, but acid-injection systems exist for extreme cases.

    What I’d buy

    Treatment type: a calcite neutralizer tank for acidic well water, sized for your flow rate and installed at the point of entry. Test pH before and after — the number tells you when the media needs replacing.

    pH won’t hurt you directly. But it decides what your water does to your pipes — and that decides what ends up in your glass. Check the pH, then filter. That’s the order.

    Curious what’s in your tap? Start with What’s In Your Water?

  • Well Water Test Kits: Strips vs. Lab Tests, and Which You Actually Need

    As an Amazon Associate, iPhilter earns from qualifying purchases.

    Here’s the thing about private well water nobody tells new well owners: you are the water utility now. No annual quality report in the mail, no treatment plant upstream — testing is on you. And the test-kit aisle is genuinely confusing: $15 strip bottles, $30 mail-in lab kits, each claiming to be the answer. Here’s which one you actually need, and when.

    What well water actually needs testing for

    City water gets tested constantly. Your well gets tested when you test it. The short list that matters:

    • Bacteria (coliform / E. coli) — the big one. Test annually, and any time the well is opened, flooded, or the water changes taste, smell, or color.
    • Nitrates — especially near farms, lawns, or septic systems. The one contaminant here that’s a real health concern at high levels, particularly for infants.
    • Iron and manganese — the staining and metallic-taste culprits. Aesthetic, not dangerous, but the reason half of well owners start shopping for filters.
    • pH — acidic well water (below ~6.5) corrodes pipes and can leach metals from your own plumbing.
    • Hardness — calcium and magnesium. Not a health issue; a soap-scum and scale issue.
    • Lead — not from the aquifer, but from older plumbing: lead solder, brass fittings, old pressure-tank components.

    Strips vs. lab tests: the honest breakdown

    Test strips are fast and cheap — dip, wait, compare the color. They’re fine screening tools for pH, hardness, iron, and chlorine. But they’re approximate by nature: reading a color shade in your kitchen lighting is not a measurement, and strips cannot reliably test for bacteria at all. Use them for troubleshooting (“is my softener working?”), not for safety verdicts.

    Lab tests are the gold standard and the definitive option for bacteria and nitrates. You fill the bottles, ship or drop them off, and get certified numbers back. They cost more ($30–$150+ depending on the panel) and take days, but a lab result is the one that counts — some states even require one when a home with a well changes hands.

    The rule of thumb: strips screen, labs decide.

    Which one do you actually need?

    • New well, or buying a home with a well: full lab panel. This is the one time to test for everything — it’s also what a home inspector or lender may require.
    • Annual checkup on an existing well: bacteria + nitrate lab test. That’s the safety baseline, once a year, every year.
    • Stains, metallic taste, or “something changed”: start with strips for iron, pH, and hardness — then order the targeted lab test for whatever the strips point at.
    • Older plumbing and a lead question: a dedicated at-home lead test gives you an answer in minutes (see the pick below).

    The picks worth owning

    TESPERT 16-in-1 Drinking Water Test Strips — the screening pick. 16 parameters (hardness, pH, iron, lead, copper, chlorine, nitrate/nitrite, alkalinity, and more), 125 strips per bottle — the best-selling drinking-water strip on Amazon. Your first move for troubleshooting: dip, read, and decide whether a lab test is warranted.

    Viotiin E. Coli & Coliform Bacteria Water Test Kit — the bacteria screen. EPA-approved-method presence/absence test with results in 24–48 hours, 4 tests per pack. A legit first-alert screen between annual lab tests — and if it ever comes back positive, that’s your signal to get the lab test.

    Safe Home DIY Lead in Drinking Water Test Kit — the lead pick. 5-minute at-home lead test with three detection levels down to 4 ppb — the #1 selling lead test kit in the world, from the only brand with the Good Housekeeping Seal. If your well system has older solder, brass fittings, or a vintage pressure tank, this answers the lead question fast.

    For the full testing walkthrough — including when to retest and what your numbers mean — see our Water Test Kits section in the buyer’s guide.

    The verdict

    • Own some strips for quick troubleshooting — pH, hardness, iron.
    • Pay for the lab for bacteria and nitrates. That’s the safety answer, and strips can’t give it.
    • Test bacteria yearly. Wells change; last year’s clean result isn’t this year’s.
    • Tested, then filter — you can’t pick the right filter until you know what’s actually in the water.

    Our test-kit picks live in the Water Test Kits section of the What’s In Your Water? buyer’s guide. As an Amazon Associate, iPhilter earns from qualifying purchases, which keeps the guides free.

    What I’d buy

    Treatment type: test first — own some test strips for quick troubleshooting (pH, hardness, iron), and pay for a certified lab test for bacteria and nitrates. That’s the safety answer, and strips can’t give it. Test bacteria yearly — wells change. Then pick the filter, not before: treatment follows diagnosis, always.

  • TDS Meters: What Your Reading Actually Means (and What It Doesn’t)

    As an Amazon Associate, iPhilter earns from qualifying purchases.

    You dipped the meter in a glass of tap water and it reads 247. Is that good? Bad? Should you be worried?

    TDS meters are the most misunderstood tool in home water testing. They give you a precise-looking number that seems to answer “is my water clean?” — but that’s not what they’re measuring. Here’s what the number actually means, and the myth that trips up almost everyone.

    What TDS is (and isn’t)

    TDS stands for total dissolved solids — everything dissolved in your water, measured in parts per million (ppm). Calcium, magnesium, sodium, potassium, carbonates, chlorides: the usual mineral content of water. A TDS meter measures the water’s electrical conductivity and converts it to an estimated ppm.

    Here’s what it does not do: it cannot tell you which dissolved solids are in there. And that distinction is everything.

    The ppm chart: what your reading means

    These ranges come from palatability guidelines (including the World Health Organization’s) — they’re about taste and aesthetic quality, not safety thresholds:

    TDS (ppm) What it means
    0–50 Very low — distilled, reverse-osmosis, or deionized water
    50–150 Excellent — crisp, clean-tasting water
    150–250 Good — typical quality tap or filtered water
    250–500 Fair — noticeable mineral content; the EPA’s secondary (aesthetic) guideline caps here at 500
    500+ Poor — investigate; likely hard, brackish, or carrying something worth identifying

    So that 247? Solidly “good.” Nothing to worry about on TDS alone.

    The big myth: TDS does not measure safety

    This is the part almost nobody explains clearly: a TDS reading tells you quantity, not quality.

    Consider two glasses, both reading 400 ppm:

    • Glass A: 400 ppm of calcium and magnesium — hard water. Annoying for your kettle, harmless to drink.
    • Glass B: 400 ppm that includes lead or arsenic — dangerous.

    The meter reads 400 for both. It cannot tell the difference. A low TDS number doesn’t certify water as safe, and a high one doesn’t prove it’s dangerous.

    It cuts the other way too. Some genuinely nasty contaminants barely move a TDS reading — certain pesticides, some volatile organics, and bacteria don’t register as “dissolved solids” the way minerals do. Water can read a beautiful 80 ppm and still have a problem a TDS meter will never see. (That’s also why the “000” reading on a ZeroWater pitcher is impressive but not a safety certificate — it proves the filter stripped the minerals, nothing more.)

    Say it plainly: a TDS meter cannot tell you your water is safe, and it cannot tell you it’s bacteria-free. Bacteria are living organisms, not dissolved minerals — the meter doesn’t test for them at all. Crystal-clear water reading 50 ppm can still carry bacteria. If microbial safety is the question, you need a bacteria test, not a TDS reading.

    What a TDS meter IS good for

    Used correctly, it’s one of the handiest $15 tools in water filtration:

    1. Verifying your RO system or distiller. Test the tap water going in, then the filtered water coming out. A working RO system should reject 90%+ of TDS — if your tap reads 300 and your RO water reads 150, something’s wrong (usually a tired membrane or a bad seal).

    2. Tracking filter life. This is the ZeroWater trick made universal: when the output number starts climbing, the filter is spent. ZeroWater’s own rule is to change the filter when the meter reads 006. Same principle applies to any filter you can test before and after.

    3. Spotting sudden changes. Your tap usually reads 180 and today it reads 420? Something changed upstream — a water main break, a treatment change, seasonal turnover in a reservoir. The meter won’t tell you what, but it tells you to look.

    When a reading means you should test further

    • Over 500 ppm: above the EPA’s secondary guideline. Could be harmless hardness, could be something else — find out which.
    • A sudden jump from your normal baseline — investigate before assuming.
    • Any specific concern (lead pipes, nearby agriculture, well water): TDS was never the right test for these. Get a test kit that targets the actual contaminant — see our Water Test Kits section.

    For the full picture of what’s in water beyond the mineral count, our water-cycle and drinking-water-types guide breaks down where tap water content comes from.

    The two meters worth owning

    You don’t need much here — TDS meters are simple instruments, and the pro standard costs less than a pizza.

    HM Digital TDS-3 — the pro pick. The pocket meter you’ll see in every water professional’s kit. Hold function, auto-off, temperature compensation — the one I trust for filter-performance checks.

    HM Digital TDS-EZ — the budget pick. Same maker, simpler package: 0–9990 ppm range, ±3% accuracy, ~1,000-hour battery. Does the job for baseline readings and filter checks.

    A related pro tip: temperature and pH

    Meters that also read temperature earn their keep: RO membranes are rated at 77°F, and cold winter tap water can cut a system’s production dramatically — if your RO seems slow in January, check the feed water temperature before blaming the membrane. And a pH meter (or pH test drops) belongs after any post-RO remineralization or alkaline stage, to verify the pH actually landed where you wanted it.

    The verdict

    • Buy a TDS meter — it’s the cheapest diagnostic tool in water filtration, and both of these cost less than a single filter cartridge.
    • Read the number for what it is: mineral content and a performance-tracking tool, not a safety verdict.
    • Remember the two glasses: 400 ppm of hardness and 400 ppm of something dangerous look identical on the display. When safety is the question, test for the specific contaminant.

    Both meters are iPhilter picks in the What’s In Your Water? buyer’s guide (TDS Meters section). As an Amazon Associate, iPhilter earns from qualifying purchases, which keeps the guides free.

    What I’d buy

    Treatment type: a TDS meter — the cheapest diagnostic tool in water filtration, less than a single filter cartridge. It tells you mineral content and tracks filter performance; it does NOT tell you if water is safe. 400 ppm of harmless hardness and 400 ppm of something dangerous look identical on the display. When safety is the question, test for the specific contaminant.