
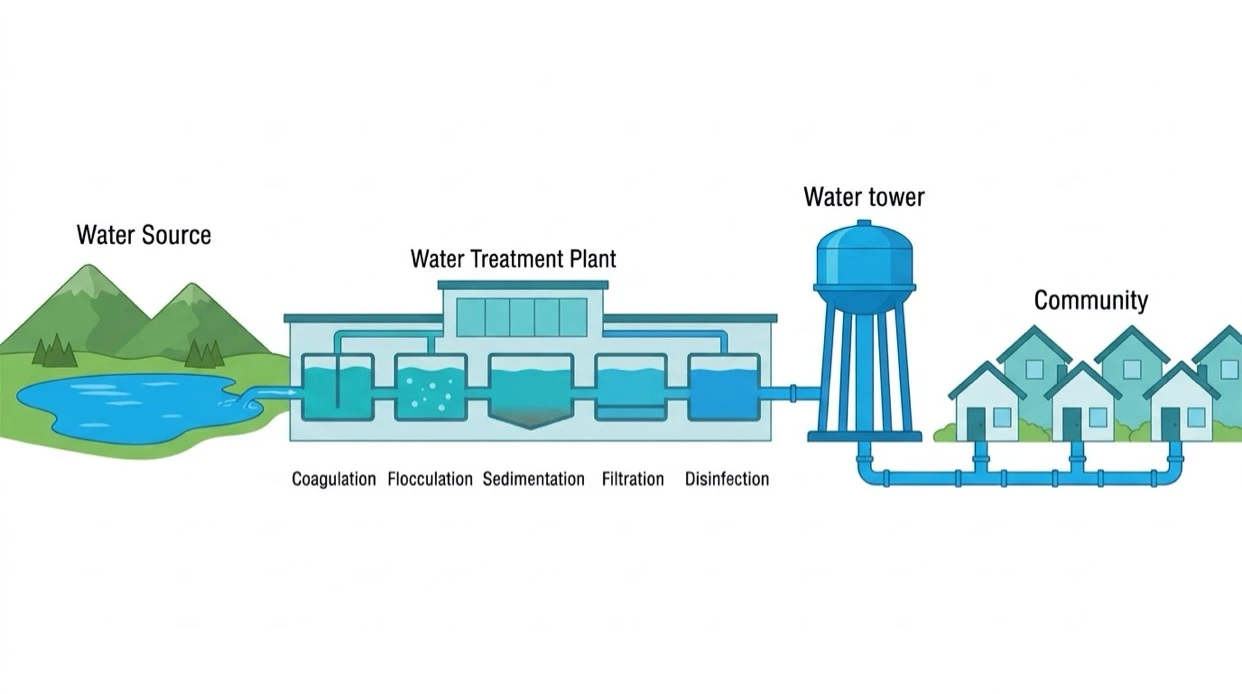
Every time you turn on your tap, clean, clear water flows out ready to use. But before that water reaches your kitchen sink or bathroom faucet, it goes through a fascinating journey. Understanding how municipal water treatment works helps us appreciate the careful science and engineering that keeps our communities healthy every single day.
Where Tap Water Begins Its Journey
Before water enters a treatment plant, it comes from a natural source in your region. Most cities and towns draw their supply from surface water sources—like rivers, lakes, streams, and open reservoirs—or from deep underground aquifers filled with groundwater.
Surface water is exposed to the elements, which means it naturally picks up soil, leaves, plant matter, and organisms as it flows across the land. Groundwater, on the other hand, is rain or melted snow that has soaked deep into the earth, getting naturally filtered by layers of sand, soil, and rock over time.
Regardless of where your water starts, public water systems collect it and route it directly into a local treatment facility. There, a multi-step purification process ensures that every drop meeting your glass is safe, clean, and refreshing.
The 5 Steps of Municipal Water Treatment
While individual water plants may adapt their process based on their specific water source, standard surface water treatment typically relies on five core steps.
1. Coagulation
The treatment process begins by bringing the raw water into large basins and adding special, safe chemicals called coagulants. Raw source water often looks slightly cloudy or turbid because it contains tiny particles of floating dirt, silt, organic matter, and clay.
Because these microscopic particles carry a negative electrical charge, they naturally repel one another, staying suspended in the water like tiny magnets pushing apart. Coagulants have a positive charge. When mixed rapidly into the water, they neutralize the negative charges on the dirt particles, allowing them to stop pushing each other away.
2. Flocculation
Once the electrical charges are neutralized, the water moves gently into a flocculation basin. Here, large mechanical paddles slowly mix the water.
During this slow mixing, the tiny dirt particles begin to stick together, forming larger, heavier clumps called “floc.” You can think of this step like rolling a snowball through wet snow: as the small particles bump into one another, they combine to form bigger, visible bundles that are much easier to remove from the water.
3. Sedimentation
After flocculation, the water flows into a calm, still basin for sedimentation. During this quiet phase, gravity does most of the heavy lifting.
Because the newly formed floc clumps are now much heavier than individual dirt particles, they slowly sink to the bottom of the settling tank. The settled solids form a layer of sludge at the bottom, which is routinely removed. Meanwhile, the clear water at the top gently overflows into channels to move on to the next stage.
4. Filtration
Even after sedimentation, small floating particles and impurities remain in the water. To clear these out, the water flows through physical filters composed of layers of carefully selected materials, typically sand, gravel, and crushed anthracite coal or activated carbon.
Filter pore size determines what gets trapped during this stage. The gravel layer sits at the bottom to support the filter structure while allowing water to pass through freely. The upper sand and coal beds feature smaller microscopic gaps between grains. As water trickles down, these small pore sizes trap fine particles of silt, algae, debris, and larger microscopic organisms.
When carbon beds are used, they do more than just strain out solids—their porous surface also adsorbs dissolved compounds that cause unpleasant tastes or odors. However, while sand, gravel, and carbon catch suspended solids and larger particles, extremely small substances—such as dissolved minerals, salts, and microscopic viruses or bacteria—are small enough to pass right through these physical gaps. That is why a final disinfection step is essential.
5. Disinfection
After the water is thoroughly filtered and visually crystal clear, it undergoes disinfection to eliminate any remaining microscopic germs, bacteria, viruses, or parasites that could cause illness.
Water treatment facilities commonly use chlorine or chloramines (a combination of chlorine and ammonia) for disinfection. A key advantage of using chlorine or chloramine is that a tiny, carefully measured amount stays dissolved in the water as a “disinfectant residual.” This residual protects the water from recontamination as it travels through miles of underground distribution mains to reach your home.
Some facilities also use primary disinfection methods like ultraviolet (UV) light or ozone gas at the plant. UV light deactivates germs using light energy, while ozone oxidizes microorganisms quickly. Both methods are exceptionally effective at neutralizing pathogens at the treatment plant. However, because UV light and ozone leave no lasting disinfectant residual in the water once it leaves the facility, water plants using them typically add a small amount of chlorine or chloramine afterward to protect the water during its journey through the pipe network.
Why Treatment Differs by Community
Not every community treats its water using the exact same sequence or intensity. The specific treatment plan depends almost entirely on the quality and nature of the original water source.
Surface water from rivers and lakes is open to rainfall, runoff, wildlife, and sunlight. As a result, it generally carries higher amounts of organic matter, mud, and microbes, making the full five-step process—including coagulation, flocculation, and sedimentation—necessary.
Groundwater from deep underground wells, by contrast, has already filtered through thick natural layers of earth and rock over many years or decades. Because it is naturally sheltered from surface runoff and dirt, groundwater is typically very clear and free of suspended solids. Communities relying on high-quality groundwater may skip the settling stages altogether, requiring only minimal filtration and basic disinfection before sending it to the tap.
Where the City’s Job Ends and Yours Begins
Municipal water suppliers work continuously to ensure that water leaving the treatment plant meets strict public health standards. However, once that clean water leaves the facility, it must travel through an extensive underground network of main lines, service pipes, and household plumbing before reaching your glass.
Along this journey, several natural changes can occur:
- Aging Utility Mains and Service Lines: Older municipal infrastructure or home plumbing can introduce iron, rust, or sediment into the water over time. In older communities, water lines connecting the main pipe under the street to a building may contain lead or older soldered copper connections.
- Fading Disinfectant: As water travels long distances through miles of pipes or sits in home plumbing over weekends, the protective disinfectant residual gradually degrades and fades over time.
- Household Plumbing Conditions: The pipes, valves, water heaters, and fixtures inside your own home can influence your water’s final taste, temperature, and mineral content.
For these reasons, many homeowners choose to test their home’s tap water to understand its exact profile. Understanding your home’s unique plumbing context allows you to make informed decisions about whether a point-of-use home filter—such as a pitcher, faucet attachment, or under-sink system—is right for your family. By combining the rigorous efforts of municipal water treatment with smart care inside the home, you can enjoy high-quality water at every tap.
Sources: CDC Drinking Water Portal (cdc.gov/drinking-water) and EPA Ground Water and Drinking Water (epa.gov).
Leave a Reply