
Category: Filtration Systems

  • How to Store a Spare RO Membrane (and Why Mine Lives in the Refrigerator)

    How to Store a Spare RO Membrane (and Why Mine Lives in the Refrigerator)

    If you own a reverse osmosis (RO) system, keeping a spare membrane on hand is cheap insurance. When your current membrane eventually degrades or clogs, having a fresh replacement ready means you don’t have to wait days for shipping or drink unfiltered tap water in the interim.

    But buying a spare is only half the battle. Store an RO membrane incorrectly and it can be ruined before it ever touches a drop of water in your system. Heat is its biggest enemy.

    I keep my own spare membrane sealed up right inside my refrigerator, and readers ask me if that’s actually necessary or just an old wives’ tale. Here’s the straightforward explanation of how membrane storage works, why temperature matters, and how to make sure your spare actually works when you need it.

    The Storage Rules: Cool, Dark, and Sealed

    The gold standard for storing any reverse osmosis membrane comes down to three rules: keep it sealed in its original packaging, keep it dark, and keep it cool.

    The ideal storage temperature for most residential RO membranes is roughly 40°F to 50°F (5°C to 10°C). DuPont FilmTec, the biggest membrane maker in the business, puts the overall storage envelope at about 22°F to 113°F (−4°C to 45°C) — but the cool end of that range is where a membrane lives longest.

    That ideal band is precisely why a home refrigerator is the best place to keep a spare. Your kitchen fridge typically sits around 35°F to 40°F — cool enough to slow microbial growth to a crawl, and nowhere near freezing.

    Two temperature warnings to remember:

    • Don’t let a wet membrane freeze. Freezing is the hard limit for a membrane stored in liquid: ice forming in that liquid can physically damage the delicate membrane layers. (A dry membrane tolerates cold far better — but there’s no reason to test either one. A refrigerator never gets close.)
    • Keep it out of the heat. Tossing a spare membrane on a shelf in a hot garage, attic, or sunny laundry room is the fastest way to ruin it. Heat breaks down the preservative in a wet membrane and accelerates biological growth — the two things that kill spares. More on that below.

    Dry vs. Wet (Preserved) Membranes: The Big Distinction

    How long your spare lasts in storage depends entirely on whether the manufacturer shipped it dry or wet.

    Dry membranes

    Many modern residential membranes — standard DuPont FilmTec elements among them — are dried during manufacturing and sealed in airtight bags.

    • Shelf life: Because there’s no moisture to support bacterial growth, a factory-sealed dry membrane keeps almost indefinitely. FilmTec’s own storage guidance puts it plainly: the storage time of dry elements is unlimited, as long as the bag stays sealed.
    • Storage needs: Keep the seal intact and the heat off it, and a dry membrane is very forgiving.

    Wet (preserved) membranes

    Some membranes are shipped wet — pre-tested and soaked in a preservative solution, typically a 1% sodium bisulfite solution.

    • Shelf life: Finite. Plan on 12 to 18 months in the original packaging as the practical ceiling, and only if it’s stored cool.
    • Storage needs: The preservative is what stops bacteria, algae, and mold from colonizing the damp membrane surface — and it doesn’t last forever. Inspect a wet-stored membrane every three months for biological growth, and refresh the preservative after about six months, or sooner if the liquid turns cloudy. If the preservative’s pH ever drops below 3, it’s done its job and then some — time to re-preserve or replace. This is where the refrigerator earns its keep: cold storage keeps that preservative stable and effective far longer than a warm shelf does.

    Why Heat Kills Spare Membranes

    Heat attacks a stored membrane from two sides:

    First, warm temperatures make the sodium bisulfite preservative in a wet membrane break down and dissipate much faster. Manufacturer storage tables are blunt about it: above about 95°F (35°C), a preserved membrane’s rated storage life collapses to roughly a month.

    Second, once the preservative is gone — or if a dry membrane’s seal is breached in a humid environment — heat acts as an accelerator for biological growth. Mold, fungi, and bacteria thrive in warm, dark spaces. Once biofouling takes root on a membrane surface, it clogs the microscopic pores — about 0.0001 micron on an RO membrane — and permanently ruins the element.

    My Own Spare, Honestly

    My spare is a standard residential membrane, and it has lived in my refrigerator for years, unused — emergency insurance, same as the rest of my gear. Here’s the honest math on a spare that old: if it shipped dry, as most modern residential membranes do, it’s very likely still good, because a sealed dry element doesn’t run on a calendar. If it shipped wet, the preservative’s rated life is long past, and no calendar can tell me whether it’s still fine. The verdict doesn’t come from the date — it comes from the install-day test below. That’s true of my spare, and it’s true of yours.

    The Day You Install an Old Spare: Step-by-Step

    When the day finally comes to unpack your stored membrane and put it to work, follow these steps to make sure it’s safe and performing correctly:

    • Inspect the packaging. Before cutting open the bag, look closely at the liquid inside (if it’s a wet membrane). If the liquid looks cloudy, discolored, or smells foul or moldy, the preservative has failed. Do not install it.
    • Install and flush thoroughly. Once the membrane is in its housing, turn on the water supply and let the system run. Throw away all the water produced during the first hour of operation. That flushes out any remaining preservative or manufacturing wetting agents.
    • Test with a TDS meter. After flushing, check your water with a handheld TDS (total dissolved solids) meter. Measure your raw tap water first, then your RO water. A healthy TFC membrane should reject roughly 96% to 98% of dissolved solids — so if your tap reads 300 and your RO water reads 6 to 12, your stored spare survived just fine.

    Summary

    Tossing a spare RO membrane in an unconditioned garage is a recipe for a ruined filter. Keep your spare sealed in its original bag, store it away from direct sunlight, and if you want it to last as long as possible, give it a little corner on a shelf in your refrigerator. Keep it cool, keep it sealed, keep it from freezing — and it will be ready to perform when your system needs it.

    Storage guidance checked against DuPont FilmTec membrane storage documentation and manufacturer storage references, October 2026.
  • Reverse Osmosis, Explained Honestly: How It Works and What It Actually Removes

    Reverse Osmosis, Explained Honestly: How It Works and What It Actually Removes

    If you have spent any time researching home water treatment, you have almost certainly run into reverse osmosis (RO). It gets recommended for almost everything — lead worries, well water issues, PFAS headlines, or just making coffee taste better.

    Because it gets pitched so aggressively, it is easy to assume RO is either a miracle solution or an expensive scam. The reality is neither. Reverse osmosis is simply a very effective, highly specific filtration technology. It is great at certain jobs, completely unnecessary for others, and comes with a few real-world tradeoffs you ought to know before spending your money. Here is the honest breakdown of how it works, what it does, and what it doesn’t do.

    What Reverse Osmosis Actually Is, in Plain English

    To understand reverse osmosis, it helps to understand regular osmosis first. In nature, if you separate freshwater and saltwater with a semipermeable membrane (a barrier with microscopic holes), freshwater naturally flows toward the saltwater side to dilute it until both sides reach balance.

    Reverse osmosis simply flips that natural process. By applying household water pressure to the concentrated side, we force water backward through the membrane. Pure water molecules get pushed through the tiny pores to the clean side, while dissolved minerals, heavy metals, and contaminants are left behind and flushed down the drain. It is pure mechanical separation using water pressure.

    How a Typical Home RO System Works, Stage by Stage

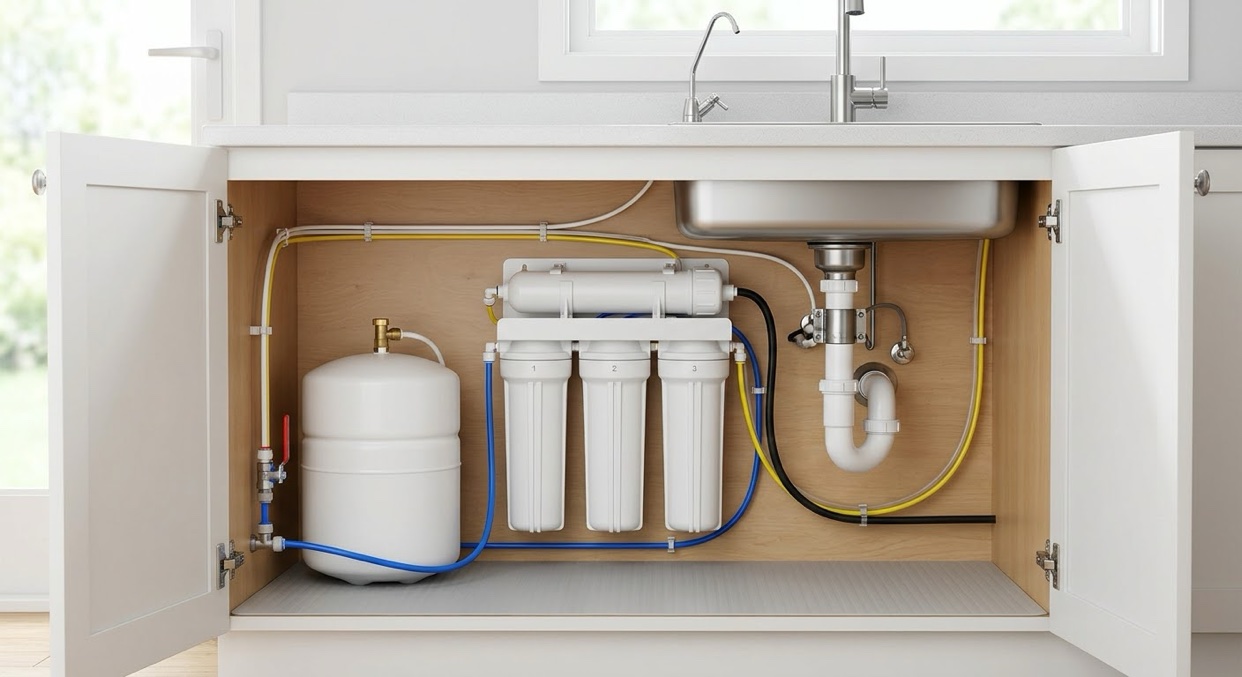
    A standalone RO membrane cannot do the job by itself. If you fed raw tap water straight into a membrane, dissolved chlorine would destroy it in short order, and floating dirt would clog its microscopic pores within weeks. That is why home RO units are multi-stage systems. Here is what each stage actually does:

    • Sediment Prefilter: Captures dirt, rust, silt, and pipe scale. Its job is to keep coarse particles from physically scratching or clogging the downstream filters.
    • Carbon Prefilter: Usually an activated carbon block. Its primary job is to remove chlorine before the water reaches the membrane — critical, because chlorine degrades thin-film composite (TFC) RO membranes. (Chloramine is harder: it needs catalytic carbon or longer contact time.)
    • The Reverse Osmosis Membrane: The heart of the system. Water is squeezed through the tight membrane, separating clean water from dissolved contaminants.
    • Storage Tank (Standard Systems): Because an RO membrane creates water slowly — drip by drip — the clean water goes into a pressurized bladder tank so you have instant flow when you open the dedicated faucet.
    • Post-Carbon Filter (Polishing Stage): As water leaves the storage tank on its way to your glass, it passes through a final inline carbon filter to scrub out any residual taste or odor picked up from sitting in the rubber bladder.

    The Two Membrane Chemistries: TFC vs. CTA

    If you look under the hood of different RO systems, you will find membranes built from one of two primary chemical compositions. Understanding the difference explains why your system is designed the way it is:

    • TFC (Thin-Film Composite Polyamide): The modern industry standard. TFC membranes deliver exceptional performance — 95% to 99% rejection of dissolved solids. Their weakness is chlorine: free chlorine permanently damages the polyamide layer (tolerance is under 0.1 ppm, and the damage accumulates with exposure). That oxidation damage is why home RO systems strictly require an activated carbon prefilter upstream of the membrane.
    • CTA (Cellulose Triacetate): The older, legacy membrane type, made from a cellulose derivative. Unlike TFC, CTA naturally tolerates continuous free chlorine (roughly 0.5 to 1.0 ppm). But it comes with clear drawbacks: lower salt rejection (roughly 85% to 95%), a narrower operating pH range, a shorter lifespan, and because it is cellulose-based, it is biodegradable — bacteria can attack the membrane itself.

    An honest note: CTA membranes are now a specialized niche choice. Nearly every standard residential reverse osmosis system sold today uses a TFC membrane, relying on the carbon prefilter to protect the delicate polyamide layer from chlorine.

    What RO Removes (and the Pore Scale)

    The RO membrane is one of the tightest liquid filtration barriers known. A typical TFC membrane has a pore rating around 0.0001 microns. To put that in perspective, a standard human hair is about 70 microns wide, and a common bacteria cell is around 1 micron.

    Because the pores are so tiny, RO excels at removing dissolved inorganic solids and heavy metals. Typical rejection rates for a properly operating system under standard household conditions:

    • Lead: 95% to 98%
    • Arsenic: 92% to 96% for arsenic V — but arsenic III is rejected poorly and inconsistently until it is oxidized to arsenic V first, which is why the EPA recommends pre-oxidation for arsenic water
    • Fluoride: 85% to 95%
    • Nitrates / Nitrites: 60% to 95% — the most variable number on this list; it depends heavily on the membrane, your water pressure, and your water’s chemistry
    • Sodium & Chloride: 85% to 98%
    • PFAS / PFOA / PFOS: 90% and up in testing — for a guaranteed claim, look for a system specifically certified to NSF/ANSI 58 for PFAS reduction
    • Total Dissolved Solids (TDS): 90% to 97% overall reduction

    Rejection is not pure size-sieving — the membrane also discriminates by chemical character and charge — but as a rule, most dissolved substances larger than a water molecule are physically rejected.

    What RO Does NOT Do Well

    Despite what sales flyers imply, RO is not a magic wand. Here is where it falls short:

    • It Needs Carbon for Chemicals: The membrane alone is weak against chlorine and many light synthetic organic chemicals and Volatile Organic Compounds (VOCs) — several are only poorly rejected and pass through. That is why the carbon pre- and post-filters are non-negotiable.
    • It Does Not Guarantee Sterilization: While an RO membrane’s pores are smaller than bacteria and viruses, standard under-sink RO units are not certified as biological sterilizers. Microscopic leaks in seals or O-rings mean you should never rely on a standard RO alone for microbiologically unsafe well water without disinfection (like UV light).
    • Dissolved Gases Pass Right Through: Gases like hydrogen sulfide (the rotten-egg smell) and dissolved carbon dioxide pass straight through the membrane.
    • It Strips “Good” Minerals: RO does not discriminate. It removes beneficial minerals like calcium and magnesium right along with lead and arsenic. This leaves the water slightly acidic (often around pH 6.0–6.5) and flat to the taste. Many owners add an inline remineralization cartridge to add calcium back and raise the pH.

    The Wastewater Question, Answered Straight

    Unlike a standard pitcher filter that processes 100% of the water poured into it, an RO membrane continuously flushes itself so contaminants do not cake onto the surface. That cross-flow process creates wastewater (called brine) that goes straight down the drain.

    • Traditional Tank Systems: Standard residential under-sink RO units historically ran at a 3:1 to 4:1 waste ratio — roughly 3 to 4 gallons down the drain for every 1 gallon of purified water produced.
    • Modern Efficient Systems: Permeate pumps and efficient modern designs have brought that down to 2:1 or even 1:1 under good water pressure and temperature. A useful shopping benchmark: EPA WaterSense-labeled point-of-use RO systems must run at 2.3:1 or better.

    While wasting water sounds alarming, perspective helps: an average family using 2 gallons of RO drinking water a day on a 2:1 system sends 4 gallons down the drain — about 120 gallons a month, roughly equivalent to two extra toilet flushes a day.

    Tank vs. Tankless RO Systems

    When shopping, you will choose between traditional tank systems and newer tankless (direct-flow) systems.

    Footprint — Tank: Larger (requires space for a 3–4 gallon tank) | Tankless: Compact (fits neatly under the sink)

    Flow Rate at Faucet — Tank: Strong flow at first from the pressurized tank, fading as the tank drains | Tankless: Steady, continuous flow powered by an internal pump — no tank, no fade

    Stagnation Risk — Tank: Water can sit in the rubber bladder | Tankless: Always fresh, direct-flow water

    Electricity Needed — Tank: No (uses incoming street pressure) | Tankless: Yes (requires an electrical outlet for the internal booster pump)

    Upfront Cost — Tank: $150 – $350 | Tankless: $350 – $700

    Who Needs RO, Who Doesn’t, and Annual Running Costs

    You Probably Need RO If:

    • Your local water quality report shows elevated levels of heavy metals (lead, arsenic), nitrates, or fluoride.
    • You are on private well water tested high in total dissolved solids (TDS) or dissolved salts.
    • You want verified removal of “forever chemicals” (PFAS) at your drinking tap.

    You Probably DON’T Need RO If:

    • You just want to remove chlorine taste and odor — a simple, inexpensive carbon block filter does this fine, without wastewater.
    • Your municipal water report is clean and you already enjoy the taste of your tap water.

    Maintenance & Real-World Running Costs

    An RO system is not a set-it-and-forget-it appliance. Filters must be changed on schedule:

    • Sediment & Carbon Prefilters: Replace every 6 to 12 months (~$30–$60/year).
    • Post-Carbon Polish Filter: Replace every 12 months (~$15–$25/year).
    • RO Membrane: Replace every 2 to 3 years (~$40–$90 per replacement).

    Total ongoing annual cost typically averages between $60 and $120 per year in replacement media, plus a minor bump in your water bill.

    Summary

    Reverse osmosis is one of the most reliable ways to get near-distilled quality drinking water right from your kitchen sink. It strips out heavy metals, nitrates, fluoride, and dissolved solids better than almost any other consumer technology.

    However, it produces wastewater, requires routine filter changes, strips healthy minerals, and relies heavily on its carbon stages to handle chemicals and chlorine. If you match the tool to the actual problem in your water, an RO system is hard to beat.

    Rejection figures are typical ranges drawn from membrane manufacturers’ published rejection charts and EPA treatment guidance, checked October 2026; your results vary with your membrane, pressure, temperature, and water chemistry. Prices are typical US retail ranges at the time of checking.

  • LifeStraw vs Sawyer MINI: Which Portable Water Filter Should You Carry?

    LifeStraw vs Sawyer MINI: Which Portable Water Filter Should You Carry?

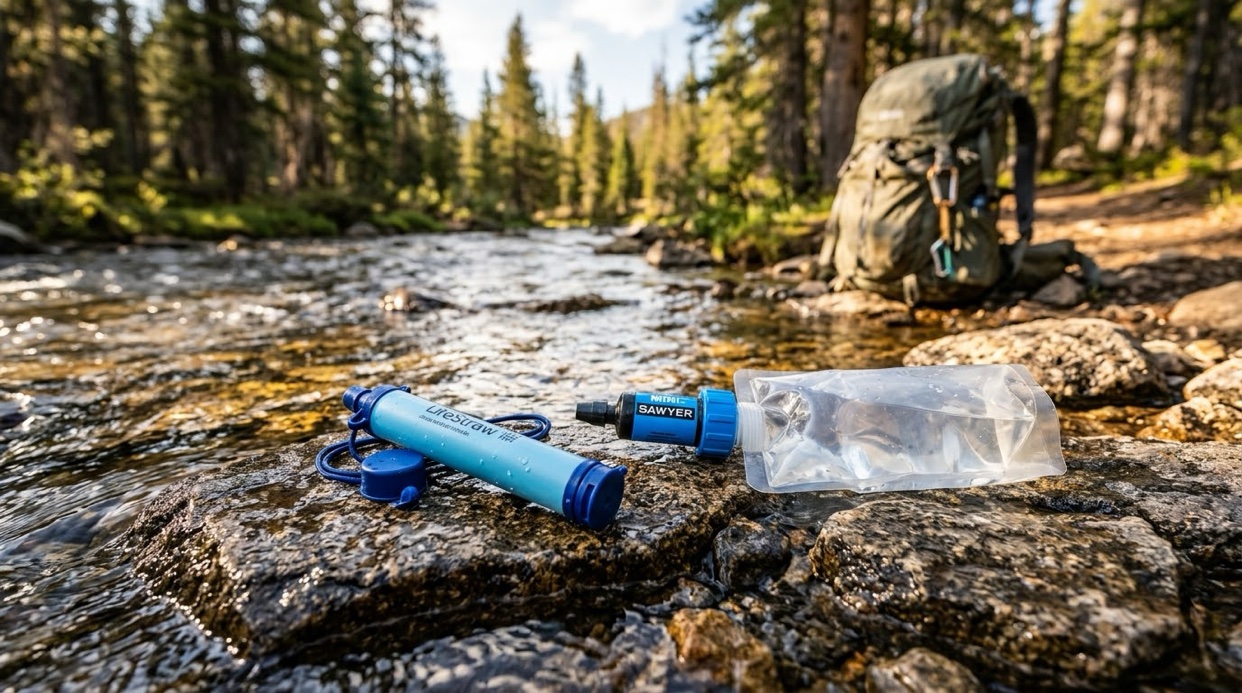
    If you have ever shopped for ultralight water filtration — whether for backpacking, international travel, or an emergency kit — you have run into the LifeStraw Personal and the Sawyer MINI. They are the two most recognizable personal water filters on the market.

    Both use hollow-fiber membrane technology, cost under $30, weigh practically nothing in a pack, and protect against dangerous waterborne pathogens out in the wilderness. Because they look so similar on paper, gear lists constantly pit them against each other. In real-world field use, though, these two filters work quite differently.

    Side-by-Side Specifications

    LifeStraw Personal

    • Filter type: Hollow-fiber membrane microfilter
    • Pore size: 0.2 micron
    • Rated lifespan: 1,000 gallons (4,000 liters)
    • Weight: 1.6 oz (46 g)
    • How you drink: Direct straw — straight from the source or a container
    • Backflushable: No syringe backflush — you blow air back through it after use
    • List price: $17.95

    Sawyer MINI

    • Filter type: Hollow-fiber membrane microfilter, absolute-rated
    • Pore size: 0.1 micron absolute (no pore larger than 0.1 micron)
    • Rated lifespan: Up to 100,000 gallons
    • Weight: 2 oz (the filter unit alone is 1.4 oz)
    • How you drink: Included squeeze pouch, standard 28mm bottles, inline on a hydration pack, or the included straw
    • Backflushable: Yes — cleaning plunger (syringe) included
    • List price: $28.99 (often sold for less)

    What Both Filters Remove

    Both filters work the same basic way: hollow-fiber membranes act like microscopic sieves. Water passes through; anything larger than the pore openings gets trapped.

    • Bacteria: LifeStraw removes 99.999999% of waterborne bacteria; the Sawyer MINI removes 99.99999%. Both cover the dangerous ones — E. coli, Salmonella, and Vibrio cholerae (cholera).
    • Protozoa and parasites: LifeStraw removes 99.999% of parasites; the Sawyer MINI removes 99.9999% of protozoa — including Giardia and Cryptosporidium.
    • Microplastics, sediment, and cloudiness: Both physically block them. LifeStraw rates microplastic reduction at 99.999%; Sawyer claims 100% of microplastics. Either way, cloudy water comes out clear.

    LifeStraw also notes the Personal meets US EPA and NSF P231 drinking water standards for the removal of bacteria and parasites.

    What NEITHER Filter Removes

    Let’s be completely blunt: neither of these is a full-spectrum purifier or a home treatment system. They are physical microfilters built for backcountry and emergency water, where microbes are the primary risk. Neither one will remove:

    • Viruses. Norovirus, Hepatitis A, and Rotavirus run roughly 0.02 to 0.08 microns across — smaller than either filter’s pores. They pass straight through.
    • Chemicals and pesticides. Agricultural runoff, industrial chemicals, and chlorine pass through a hollow-fiber membrane untouched. There is no activated carbon stage in either base model.
    • Heavy metals. Dissolved lead, arsenic, and mercury need chemical reduction, ion exchange, or reverse osmosis. A microfilter will not reduce them.
    • PFAS. The “forever chemicals” cannot be screened out by physical microfiltration alone.
    • Bad taste and odor. No carbon core means stagnant, marshy water still tastes like stagnant, marshy water.

    The step up is reverse osmosis — and it doesn’t have to mean a plumbed-in system. Manual hand-pump RO units exist for off-grid and emergency use (I keep one in my own kit). One honest caveat: unlike home RO systems, none of the hand-pump models is NSF/ANSI 58 certified — you are trusting the membrane, not a certification.

    If you need to treat tap water at home, or water near agricultural or industrial runoff, you need a dedicated home system or a true purifier. These little filters are for pathogens on the trail.

    Real-World Differences That Actually Matter

    Versatility and threading

    This is the biggest practical difference. The LifeStraw Personal is a pure drinking straw: you kneel at the stream, or stick it in a cup or wide-mouth bottle, and suck. The classic model has no threads, so you can’t screw it onto a bottle or squeeze filtered water into a cook pot for a group. (Worth knowing: LifeStraw’s newer Peak Series straw fixes exactly this — its removable bottom cap threads onto standard bottles and gravity hoses. Same membrane and ratings, a little more money, 2.3 oz.) The Sawyer MINI has standard 28mm threads — it screws onto disposable water bottles, attaches to its included squeeze pouch, runs inline on a hydration bladder, or works with its included straw.

    Flow rate and clogging

    LifeStraw’s slightly larger 0.2-micron pores make for an easier pull when drinking straight from a source, though flow fades as silt builds up. The MINI’s tight 0.1-micron absolute pores are the safer barrier, but its small surface area makes it slow — filter silty water and it clogs fast and needs cleaning in the field. Even dealers will tell you the MINI filters slower and needs more frequent backflushing than its bigger brother, the Sawyer Squeeze.

    Cleaning and maintenance

    LifeStraw maintenance is blowing air back through the straw after use to clear water and sediment — LifeStraw itself calls this backwashing, but there’s no syringe and no deep flush. Once silt permanently clogs the membrane, the filter is done. The Sawyer MINI ships with a cleaning plunger: push clean water backward through it and you flush out the trapped sediment. Sawyer says a proper backwash restores up to 98.5% of the filter’s flow rate — which is how the MINI can carry that huge lifespan rating.

    Realistic lifespan

    LifeStraw is rated for 1,000 gallons (4,000 liters) — for one person, that’s years of emergency and weekend use, and it has an unlimited shelf life sitting in a kit. The MINI is rated up to 100,000 gallons. You’ll never filter 100,000 gallons in a lifetime, but because it can be backflushed and restored, it will outlast the LifeStraw under heavy field use.

    Who Should Buy Which One?

    Buy the LifeStraw Personal if:

    • You’re building emergency kits — it’s grab-and-go, foolproof, and has no loose accessories or syringe to keep track of.
    • You want absolute simplicity: no threads to match, no pouches to roll. Stick it in water and drink.
    • Budget comes first: at $17.95, it’s one of the most accessible emergency filters on earth.

    Buy the Sawyer MINI if:

    • You’re a backpacker or hiker — fill a bottle or the pouch, screw the MINI on, drink on the go or squeeze clean water into a cook pot.
    • You want one filter that works four ways: straw, squeeze, inline on a bladder, or gravity-fed.
    • You want long-term durability: backflushing gives it a far longer working life.

    What I’d Buy: The Honest Verdict

    Full disclosure first: I own LifeStraws myself — two different models, and they live in my go bag. For an emergency kit I’d buy them again — nothing to assemble, nothing to lose, ready in ten years if they have to be.

    But if I had to pick just one for a hiking pack, I’d pick the Sawyer MINI. Being forced to put your face down at a dirty water source every time you drink is a real limitation on the trail. The MINI screws onto a standard bottle or its own pouch, so you fill up and walk. Add the syringe backflushing and the 100,000-gallon rating, and it wins on versatility and maintainability every time.

    One step-up worth knowing: if your trails run silty or muddy, look at the standard Sawyer Squeeze — same idea, larger surface area, faster flow. Between the two little ones, though, the MINI is the trail pick and the LifeStraw is the emergency-kit pick. Honestly, at these prices, owning both — one in the pack, one in the kit — is a perfectly reasonable answer. It’s the direction my own kit is heading: the LifeStraws aren’t leaving my go bag, and I’d add the Sawyer alongside them.

    Specs and removal rates are from the manufacturers’ own product pages (LifeStraw.com and Sawyer), checked October 2026. Prices are US list prices at the time of checking and change often — confirm before you buy.

  • How Your City Water Gets Treated: From the Reservoir to Your Faucet

    How Your City Water Gets Treated: From the Reservoir to Your Faucet

    Every time you turn on your tap, clean, clear water flows out ready to use. But before that water reaches your kitchen sink or bathroom faucet, it goes through a fascinating journey. Understanding how municipal water treatment works helps us appreciate the careful science and engineering that keeps our communities healthy every single day.

    Where Tap Water Begins Its Journey

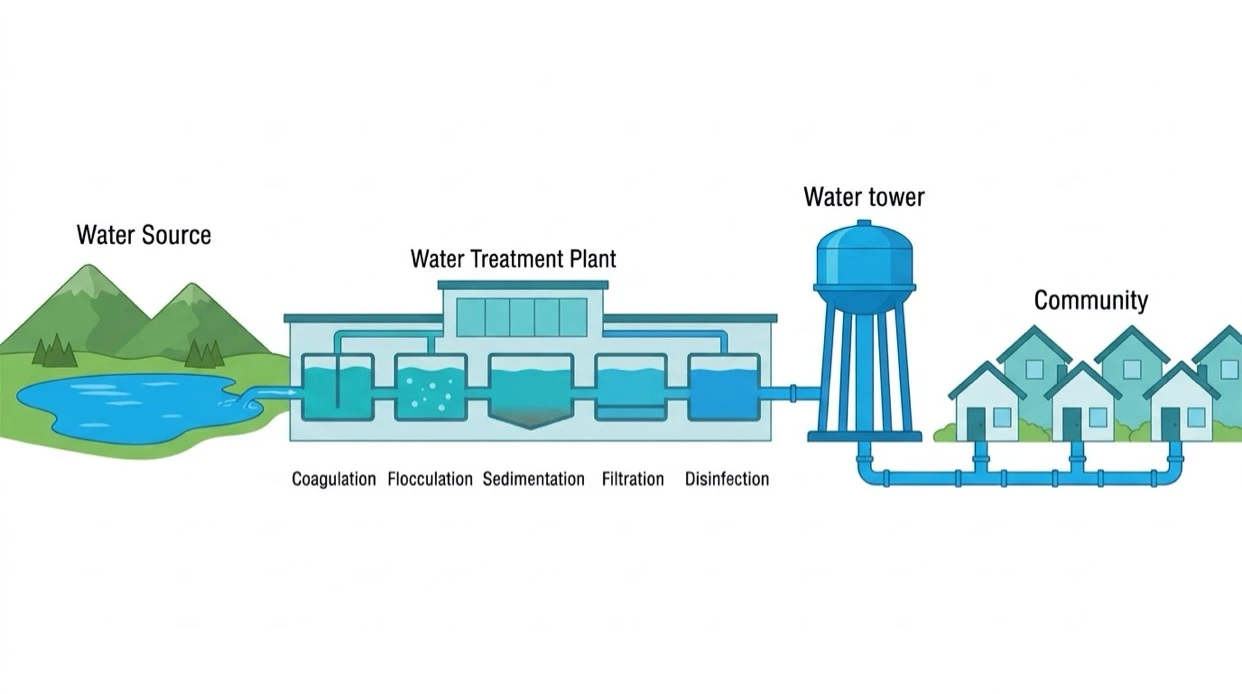
    Before water enters a treatment plant, it comes from a natural source in your region. Most cities and towns draw their supply from surface water sources—like rivers, lakes, streams, and open reservoirs—or from deep underground aquifers filled with groundwater.

    Surface water is exposed to the elements, which means it naturally picks up soil, leaves, plant matter, and organisms as it flows across the land. Groundwater, on the other hand, is rain or melted snow that has soaked deep into the earth, getting naturally filtered by layers of sand, soil, and rock over time.

    Regardless of where your water starts, public water systems collect it and route it directly into a local treatment facility. There, a multi-step purification process ensures that every drop meeting your glass is safe, clean, and refreshing.

    The 5 Steps of Municipal Water Treatment

    While individual water plants may adapt their process based on their specific water source, standard surface water treatment typically relies on five core steps.

    1. Coagulation

    The treatment process begins by bringing the raw water into large basins and adding special, safe chemicals called coagulants. Raw source water often looks slightly cloudy or turbid because it contains tiny particles of floating dirt, silt, organic matter, and clay.

    Because these microscopic particles carry a negative electrical charge, they naturally repel one another, staying suspended in the water like tiny magnets pushing apart. Coagulants have a positive charge. When mixed rapidly into the water, they neutralize the negative charges on the dirt particles, allowing them to stop pushing each other away.

    2. Flocculation

    Once the electrical charges are neutralized, the water moves gently into a flocculation basin. Here, large mechanical paddles slowly mix the water.

    During this slow mixing, the tiny dirt particles begin to stick together, forming larger, heavier clumps called “floc.” You can think of this step like rolling a snowball through wet snow: as the small particles bump into one another, they combine to form bigger, visible bundles that are much easier to remove from the water.

    3. Sedimentation

    After flocculation, the water flows into a calm, still basin for sedimentation. During this quiet phase, gravity does most of the heavy lifting.

    Because the newly formed floc clumps are now much heavier than individual dirt particles, they slowly sink to the bottom of the settling tank. The settled solids form a layer of sludge at the bottom, which is routinely removed. Meanwhile, the clear water at the top gently overflows into channels to move on to the next stage.

    4. Filtration

    Even after sedimentation, small floating particles and impurities remain in the water. To clear these out, the water flows through physical filters composed of layers of carefully selected materials, typically sand, gravel, and crushed anthracite coal or activated carbon.

    Filter pore size determines what gets trapped during this stage. The gravel layer sits at the bottom to support the filter structure while allowing water to pass through freely. The upper sand and coal beds feature smaller microscopic gaps between grains. As water trickles down, these small pore sizes trap fine particles of silt, algae, debris, and larger microscopic organisms.

    When carbon beds are used, they do more than just strain out solids—their porous surface also adsorbs dissolved compounds that cause unpleasant tastes or odors. However, while sand, gravel, and carbon catch suspended solids and larger particles, extremely small substances—such as dissolved minerals, salts, and microscopic viruses or bacteria—are small enough to pass right through these physical gaps. That is why a final disinfection step is essential.

    5. Disinfection

    After the water is thoroughly filtered and visually crystal clear, it undergoes disinfection to eliminate any remaining microscopic germs, bacteria, viruses, or parasites that could cause illness.

    Water treatment facilities commonly use chlorine or chloramines (a combination of chlorine and ammonia) for disinfection. A key advantage of using chlorine or chloramine is that a tiny, carefully measured amount stays dissolved in the water as a “disinfectant residual.” This residual protects the water from recontamination as it travels through miles of underground distribution mains to reach your home.

    Some facilities also use primary disinfection methods like ultraviolet (UV) light or ozone gas at the plant. UV light deactivates germs using light energy, while ozone oxidizes microorganisms quickly. Both methods are exceptionally effective at neutralizing pathogens at the treatment plant. However, because UV light and ozone leave no lasting disinfectant residual in the water once it leaves the facility, water plants using them typically add a small amount of chlorine or chloramine afterward to protect the water during its journey through the pipe network.

    Why Treatment Differs by Community

    Not every community treats its water using the exact same sequence or intensity. The specific treatment plan depends almost entirely on the quality and nature of the original water source.

    Surface water from rivers and lakes is open to rainfall, runoff, wildlife, and sunlight. As a result, it generally carries higher amounts of organic matter, mud, and microbes, making the full five-step process—including coagulation, flocculation, and sedimentation—necessary.

    Groundwater from deep underground wells, by contrast, has already filtered through thick natural layers of earth and rock over many years or decades. Because it is naturally sheltered from surface runoff and dirt, groundwater is typically very clear and free of suspended solids. Communities relying on high-quality groundwater may skip the settling stages altogether, requiring only minimal filtration and basic disinfection before sending it to the tap.

    Where the City’s Job Ends and Yours Begins

    Municipal water suppliers work continuously to ensure that water leaving the treatment plant meets strict public health standards. However, once that clean water leaves the facility, it must travel through an extensive underground network of main lines, service pipes, and household plumbing before reaching your glass.

    Along this journey, several natural changes can occur:

    • Aging Utility Mains and Service Lines: Older municipal infrastructure or home plumbing can introduce iron, rust, or sediment into the water over time. In older communities, water lines connecting the main pipe under the street to a building may contain lead or older soldered copper connections.
    • Fading Disinfectant: As water travels long distances through miles of pipes or sits in home plumbing over weekends, the protective disinfectant residual gradually degrades and fades over time.
    • Household Plumbing Conditions: The pipes, valves, water heaters, and fixtures inside your own home can influence your water’s final taste, temperature, and mineral content.

    For these reasons, many homeowners choose to test their home’s tap water to understand its exact profile. Understanding your home’s unique plumbing context allows you to make informed decisions about whether a point-of-use home filter—such as a pitcher, faucet attachment, or under-sink system—is right for your family. By combining the rigorous efforts of municipal water treatment with smart care inside the home, you can enjoy high-quality water at every tap.

    Sources: CDC Drinking Water Portal (cdc.gov/drinking-water) and EPA Ground Water and Drinking Water (epa.gov).

  • Filter Media, Explained: What’s Inside Your Filter — and Why Your Water Smells Like Fish

    Filter Media, Explained: What’s Inside Your Filter — and Why Your Water Smells Like Fish

    Every water filter ever sold is the same product wearing different clothes: a box, water flowing through it, and a material inside doing the actual work. That material is called the media, and the media — not the brand name on the tank — decides what comes out of your water and what stays in. Here’s the honest tour of what’s inside the box.

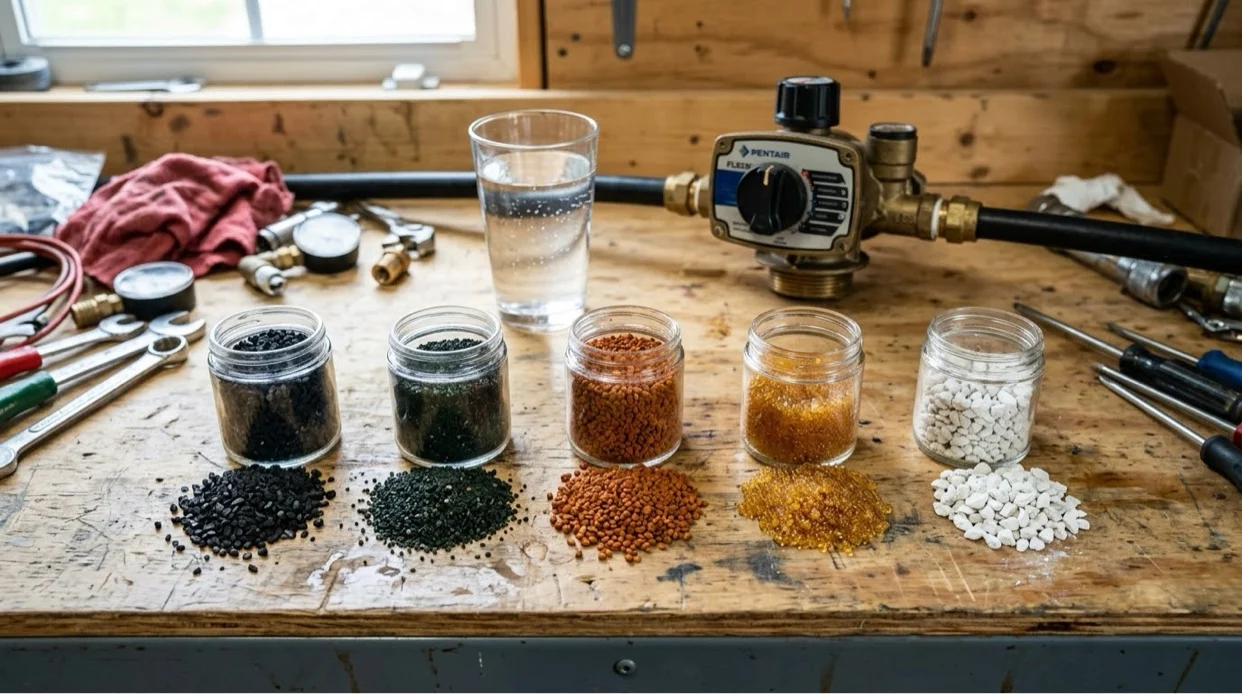
    Granular activated carbon (GAC). The workhorse. Water passes over a bed of tiny carbon granules and contaminants stick to their enormous surface area — that’s adsorption. GAC is excellent on chlorine, bad taste and odor, and many VOCs (the chemical family from solvents and fuels). Its weaknesses: it’s slow against chloramine, it doesn’t do metals, and water can carve channels through a settled bed and slip past untreated. You’ll also see silver-impregnated carbon, sold as “bacteriostatic” — the silver keeps bacteria from colonizing the carbon bed itself. Honest note: that’s all it does. It does not disinfect your water, and it carries no purifier claim.

    Catalytic carbon. GAC’s upgraded cousin — carbon treated so its surface doesn’t just grab contaminants, it chemically converts them. This is the media for chloramine (the disinfectant GAC struggles with), hydrogen sulfide (rotten-egg gas), and some iron. It costs more, and it wants sediment filtered out ahead of it so the surface stays clean.

    Carbon block. Carbon ground up and pressed into a solid block, so water has to push through it instead of around granules. That structure adds fine sediment filtration and, in a tight enough block, cyst removal. This is where microns matter: a block rated 0.5 micron absolute is fine enough to stop cysts like Giardia — “absolute” means essentially everything that size is caught, while a “nominal” rating at the same number only catches most of it. The trade-off is flow: tighter block, more pressure drop, and it clogs fast if dirty water hits it first.

    KDF media. Granules of copper and zinc alloy that work by redox — a tiny electrochemical reaction. KDF-55 is aimed at chlorine and soluble heavy metals; KDF-85 is the version for ferrous iron and hydrogen sulfide. It’s dense, heavy stuff, and it needs a strong backwash to stay clean, which is why you mostly see it in whole-house systems and shower filters rather than pitchers.

    Birm, greensand, and the oxidizing bench. A family of dark, heavy media built to do one trick: grab dissolved iron and manganese out of the water and turn them into particles the bed can strain out — the oxidation-plus-filtration the iron and manganese articles keep pointing at. Birm is a lightweight media coated in manganese dioxide, which acts as a catalyst: with enough dissolved oxygen in the water (and pH up around 6.8 or better), it oxidizes iron on contact and needs no chemicals to regenerate — just a backwash. Manganese greensand (today usually GreensandPlus) is the old-school original: it oxidizes and filters in one bed, but it needs to be regenerated with potassium permanganate, or fed chlorine continuously, to keep its coating alive. Filox is the heavyweight cousin — solid manganese dioxide ore, higher capacity, hungrier for backwash flow. Pick wrong for your water chemistry and these beds fail quietly, which is why the test numbers come before the tank.

    Calcite — the pH fixer. Not every media removes something; calcite’s job is to give something back. It’s crushed calcium carbonate — marble, basically — and acidic water slowly dissolves it as it passes through, raising the pH toward neutral. That’s the fix for the low-pH water that leaches copper and lead out of plumbing (the hydrogen article’s villain). It’s sacrificial: the bed literally gets eaten, so it needs topping up every year or so, and it adds a little hardness back as it works. For very low pH, calcite gets blended with Corosex (magnesium oxide), which corrects harder but can overshoot if it’s used alone.

    Filter-Ag and the sediment bench. Somebody has to stand at the door and catch the grit before it fouls the expensive media downstream. Filter-Ag is a lightweight aluminosilicate granule used in backwashing sediment tanks — lighter than sand, so it backwashes clean at lower flow, with a big capacity for holding suspended dirt. Anthracite plays the same role layered into multi-media beds. No chemistry here, just a bouncer — but every media in this article lasts longer with one working ahead of it.

    Cation resin — the softener resin everyone knows. Millions of tiny beads pre-loaded with sodium. Hard water flows through, and calcium and magnesium (both positively charged — cations) swap places with the sodium. When the beads are spent, salt brine flushes the hardness off and reloads them. One job, done well: killing hardness. It also grabs low levels of iron and manganese, which is why softeners sometimes double as light iron filters — and why chlorine in the water slowly chews the beads up over the years.

    Anion resin — the lesser-known sibling. Same bead idea, opposite charge: anion resin trades negative ions. That’s not hardness — that’s nitrate, sulfate, tannins (the tea color in well water), and arsenate. It’s the specialist you bring in when the problem isn’t scale but a specific contaminant on the negative list. It regenerates differently from softener resin — caustic soda or salt depending on the type — and it has one famous quirk, which brings us to the fish. (Honorable mention while we’re on specialists: activated alumina, an adsorptive media that earns its living on fluoride and arsenic — you met it in the fluoride article.)

    Why your water smells like fish. Here’s a call every honest water tech has taken: “My water smells like a fish market.” Nine times out of ten, there’s anion resin in the system. The most common strong-base anion resin (Type 1) is built with a chemical group based on trimethylamine — literally the compound that makes old fish smell like old fish. When chlorine or chloramine in the water attacks those groups, or the resin runs exhausted, trace amines break loose and the water picks up the smell. Two honest facts: your nose can detect trimethylamine at astonishingly low levels, so a whisper of it smells like a dock — and at the levels involved, it’s an aesthetic problem, not a poisoning. It’s still worth fixing, because nobody should have to hold their nose to drink.

    The fixes. Carbon before the anion resin, to strip the chlorine out first — chlorinated water should never run straight through anion resin; that’s the whole ballgame. New resin gets a thorough rinse (a good flush of many bed volumes) before it goes into service. Exhausted resin gets regenerated; resin that’s been oxidatively chewed up gets replaced. And if you’re specifying a new system, Type 2 anion resin is built on a different amine chemistry and is far less prone to the fishy release. Buy potable-grade resin certified to NSF/ANSI 61 — the standard for materials that touch drinking water.

    Where they meet. Run water through both resins — cation in one form, anion in another — and you get deionized water: virtually everything dissolved stripped out. That’s lab water, aquarium water, spot-free-rinse water. For drinking, it’s overkill, and water that pure is aggressive — it wants to dissolve something, which is a whole other article.

    What I’d buy: Match the media to your test results, not to a sales pitch. Chlorine taste: GAC. Chloramine: catalytic carbon. Cysts: a 0.5-micron absolute carbon block. Hardness: cation resin (a softener). Iron and manganese with oxygen in the water: a Birm or greensand bed. Acidic water eating your pipes: calcite. Nitrate or tannins: anion resin — with carbon ahead of it, always. And if your water smells like fish, don’t replace the whole system before you check what’s happening at the anion bed.

    The box is just plumbing. The media is the filter. Know which one your water needs, and you’ll never buy the wrong box again.

    Curious what’s in your tap? Start with What’s In Your Water?

  • The Only Thing That Actually Softens Shower Water

    The Only Thing That Actually Softens Shower Water

    Hard water in the shower is one of the most common complaints I hear: dry skin, dull hair, chalky buildup on the glass. And the market’s answer is a wall of “shower filters” promising soft, silky water. So let’s clear this up once, plainly, because almost nobody selling these will.

    A shower filter and a shower softener are not the same thing, and the industry is happy to blur them.

    A shower filter — carbon, KDF, vitamin C, whatever’s in the cartridge — can reduce chlorine and improve the smell. It cannot soften water. Softening means removing calcium and magnesium, and the only residential way to do that is ion exchange: resin beads that grab the hardness minerals and get recharged with salt. No salt, no softening. That’s chemistry, not marketing.

    What actually softens a shower

    Option one: a shower-head softener like the ShowerStick (~$280). A real ion-exchange unit that hangs on the shower arm. It works — briefly. The resin bed is tiny, so you’re regenerating with table salt constantly, and you’re showering through a flimsy handheld. Tedious is the kind word.

    Option two: a portable tank softener (On The Go and its clones). The same ion-exchange chemistry in a bigger tank — 8,000 to 16,000 grains — regenerated with table salt in about 30 minutes. A more serious tool, and a cumbersome one: hauling the tank, hooking up hoses, finding somewhere to plumb it inline. No portable on the market carries NSF/ANSI 44 or WQA product certification. “NSF certified media” on the label means the resin is safe — it doesn’t mean anyone verified the softening. And most apartment renters can’t plumb a tank inline anyway, which makes this mostly an RV, marine, and spot-use answer.

    How to check any of them yourself

    A $15 hardness test kit. Test before, test after. If the number doesn’t drop, the softener isn’t softening — no badge or brand name overrides that.

    The bottom line: if it doesn’t use salt, it doesn’t soften. Everything else is a filter wearing a softener’s costume.

    Start here: What’s In Your Water? — learn how to read your water report and test your own tap.

  • Carbon Filtration, Explained Honestly: Types, Uses, and the Hills and Valleys Nobody Talks About

    Carbon Filtration, Explained Honestly: Types, Uses, and the Hills and Valleys Nobody Talks About

    If you’ve shopped for a water filter, you’ve seen the word “carbon” everywhere. Carbon filter. Carbon block. Catalytic carbon. Coconut carbon. Silver-impregnated carbon. The marketing makes them all sound the same. They’re not.

    I’ve spent three decades in water treatment, and carbon is the hardest-working media in the business — and the most misunderstood. So let’s do this the way it should be done: educate, educate, educate the consumer. Here’s what carbon actually is, the real differences between the types, and the one thing about carbon’s surface that changes how you should set up your whole system.

    What activated carbon actually does

    Activated carbon doesn’t work like a strainer. It works by adsorption — with a D, not a B. Contaminants stick to the carbon’s surface rather than passing through it. One gram of activated carbon can have over 3,000 square meters of surface area. That’s the whole game: enormous surface, tiny spaces, contaminants get grabbed and held.

    What it’s genuinely great at: chlorine taste and odor, many volatile organic compounds (VOCs), pesticides and herbicides, trihalomethanes (THMs), and improving overall taste and smell. What it does poorly or not at all: dissolved metals like lead and arsenic, nitrates, fluoride, hardness minerals, and dissolved salts. Anyone who tells you a carbon filter “removes everything” is selling you something. I won’t.

    The types of carbon — and why the source material matters

    Coconut shell carbon. The premium choice for drinking water, and it’s not close for taste, odor, and chlorine work. Coconut shell produces a hard, dense carbon dominated by micropores — the smallest pores — which are exactly the right size to grab small molecules like chlorine and the compounds behind bad taste and odor. It also has a high iodine number, the industry’s rough measure of micropore activity. When someone asks me what carbon to put in a drinking-water filter, coconut shell is my answer.

    Bituminous coal carbon. The workhorse of whole-house and municipal systems. Harder than wood-based carbon, with a mix of micropores and mid-size pores, so it handles a broader range of contaminants. Tough, durable, and it backwashes well in tank systems. Most of the big backwashing carbon tanks you’ve seen — including the Fleck-valve units — run on coal-based carbon.

    Wood-based carbon. Softer, with larger macropores. Better at grabbing bigger molecules — it’s the decolorization specialist — but it doesn’t hold up as well physically and isn’t the first pick for drinking water.

    Lignite carbon. Similar story to wood: larger pores, softer structure, niche uses.

    Catalytic carbon. This is surface-modified carbon — the surface chemistry is changed to speed up reactions. Its claim to fame is chloramine. Standard carbon removes chloramine slowly and poorly; catalytic carbon handles it far better. It also does strong work on hydrogen sulfide (rotten-egg smell). If you’re on city water treated with chloramine instead of chlorine — and more cities are switching every year — catalytic carbon is what you want in the tank, not standard GAC.

    Silver-impregnated carbon. Here’s where I need you to hear me clearly: silver-impregnated carbon is bacteriostatic. That word matters. It means the silver inhibits the growth and multiplication of bacteria within the filter bed itself. It does not disinfect your water. It does not make non-potable water safe. What it does is keep the carbon bed from becoming a bacteria farm between filter changes — carbon removes the chlorine that was keeping microbes in check, so the bed is a comfortable place for them. The silver keeps the media hygienic longer. Bacteriostatic. Not bactericidal. Anyone who blurs that line is misleading you.

    GAC vs. carbon block — and micron ratings, honestly explained

    Granular activated carbon (GAC) is loose granules in a cartridge or tank. Water flows around and through the granules. Good contact time in a properly sized tank; in a small cartridge, contact time is short and performance drops off.

    Carbon block is carbon powder fused into a solid block. Water is forced through the block, so contact is more thorough — and the block itself acts as a particulate filter with a real micron rating.

    And here’s where I teach you something the industry hopes you never learn: micron ratings come in two kinds, and only one of them means what you think.

    • Absolute rating means the filter is tested to remove a stated percentage (typically 98–99%+) of particles at or above that size. A 1-micron absolute filter stops essentially everything 1 micron and up.
    • Nominal rating means the filter removes some percentage — often around 85% — of particles at that size. A “5-micron nominal” filter lets a meaningful share of 5-micron particles straight through.

    Same number on the label, completely different filter. When you compare carbon blocks, find out whether the rating is absolute or nominal. If the manufacturer won’t say, assume nominal — and assume the worst.

    The hills and valleys — the thing nobody tells you about carbon

    Now the part that matters most, and the reason I wrote this article.

    Carbon’s surface is not smooth. Under magnification, it’s a landscape — hills and valleys, peaks and pores, an irregular terrain at the microscopic level. That’s what gives it all that surface area. But those valleys are also traps.

    When fine particulate — oxidized iron, sulfur, sediment — reaches a carbon bed, it doesn’t just sit on top. It works down into the valleys and lodges there. And here’s the part the brochures skip: backwashing doesn’t properly remove it. Backwash lifts and fluffs the bed, and it carries off what’s loose. But particulate wedged into the hills and valleys stays wedged. Over time the bed fouls. Capacity drops. Water starts channeling through the paths of least resistance instead of contacting the carbon evenly. Your expensive carbon tank quietly stops doing its job, and nothing on the outside tells you.

    This isn’t theory. I’ve opened fouled carbon beds. I’ve seen what backwash leaves behind.

    After chlorination: Filter-Ag before carbon, every time

    This is where the hills and valleys turn into a system-design rule.

    Chlorination oxidizes dissolved iron and sulfur — turns them from invisible dissolved contaminants into visible particulate (that fragile iron floc). That’s the point of chlorinating: make the iron filterable. But if that freshly oxidized particulate goes straight into your carbon bed, it packs into the valleys and never fully comes out, no matter how faithfully you backwash.

    So the rule, consistently applied: after chlorination, run a Filter-Ag filter before the carbon.

    Filter-Ag is a lightweight silica filter media — fractured edges, irregular surface — that pulls suspended solids down into the 20–40 micron range, and field experience has shown its rough surface is excellent at entrapping exactly that fragile oxidized iron floc. It takes the beating so the carbon doesn’t have to. The carbon then does what carbon does best: taste, odor, chlorine and chemical polish on water that’s already been cleared of particulate.

    The sequence matters: chlorinate → Filter-Ag → carbon. Skip the middle step and you’re feeding your carbon bed a steady diet of valley-fouling particulate. Put it in and your carbon lasts longer, performs better, and actually gets to do its job.

    What I’d buy

    Treatment type: a backwashing carbon tank with a Fleck 5600SXT valve for whole-house chlorine, taste, and odor work on city water — and if you’re on chloramine, make it catalytic carbon in that tank. Dealing with well water, iron, or sulfur ahead of the carbon? That’s exactly the system where a Filter-Ag stage ahead of the carbon earns its keep. Both picks live in the Carbon Filtration section of the buyer’s guide, along with the full Fleck vs. Clack vs. Autotrol breakdown.

    The bottom line

    Carbon is the hardest-working media in water treatment — but only when it’s the right carbon, in the right form, with the right water reaching it. Know your carbon type. Know your micron rating — absolute or nominal. Respect the hills and valleys. And after chlorination, always Filter-Ag before carbon.

    Start here: What’s In Your Water? — learn how to read your water report and test your own tap.

  • How to Spot an Honest Water Treatment Company (The WQA Code of Ethics, Translated)

    Somebody knocks on your door with a little vial kit, puts a few drops in your tap water, and the water turns brown or full of flakes. Then comes the pitch: your water is dangerous, and their $8,000 system is the only thing standing between you and disaster.

    I’ve watched this show for three decades in water treatment. Sometimes the performance is honest. Often it isn’t. And there is actually a written standard for telling the difference — the Water Quality Association’s Code of Ethics. Every WQA member company pledges to follow it. Most consumers have never heard of it. Let’s fix that.

    I’m not a WQA member and I don’t speak for them. I’m just a guy who’s spent thirty years in this industry and believes you deserve to know what ethical companies have already promised to do. Here’s the code, translated into plain English.

    1. They tell the truth about YOUR water

    The code requires members to accurately represent the source water supply. That means: what’s actually in your water, based on real testing — not theater. Those dramatic precipitation tests? They make almost any water look scary, including perfectly fine water. An honest company tests your water properly and tells you what’s really there, numbers and all.

    2. They tell the truth about what their product does

    Members must accurately represent the performance of their process and the real benefit of their products. “Removes 99% of everything” is a red flag. Honest companies name the contaminant, name the reduction rate, and can point to independent certification — NSF/ANSI or WQA Gold Seal — backing it up.

    3. They recommend only what you need

    This one’s my favorite: the code calls for good judgment in recommending products and respecting the customer — which means selling you what your water actually needs, not the biggest system in the catalog. If your water needs a $300 sediment filter and they’re pitching a $9,000 whole-house system, walk away.

    4. They tell you about maintenance and cost up front

    Ethical companies inform you about maintenance, service requirements, and the related costs before you buy. Filters need changing. Softeners need salt. UV lamps burn out. If nobody mentions upkeep until after the check clears, that’s your answer about their ethics.

    5. They don’t trash-talk your tap water to scare you

    The code’s marketing guidelines exist specifically to stop companies from misleading consumers about the quality of public or private water supplies. Your municipal water is tested and regulated. A salesperson who tells you it’s poison isn’t educating you — they’re setting up a sale.

    6. They stand behind what they install

    Members pledge dependable service and follow-through on every commitment. The company that installed it should still answer the phone a year later. Ask about service before you buy, not after.

    How to use this

    You don’t need to memorize the code. Just keep this one question in your pocket when anyone tries to sell you water treatment:

    “Are you telling me what’s in my water, or are you telling me what to fear?”

    Honest companies do the first. The code says so. And if a company claims to follow the WQA Code of Ethics, you can hold them to it — violations can cost them their membership.

    Want the full document? Here it is, straight from the source: WQA Code of Ethics (PDF)

    Educate. Educate. Educate. The consumer. That’s the whole mission.

  • EPA Drinking Water Standards Decoder: MCL vs. MCLG and What the Legal Limits Actually Mean

    EPA Drinking Water Standards Decoder: MCL vs. MCLG and What the Legal Limits Actually Mean

    You’ve seen it on filter boxes: “meets EPA standards.” Sounds official. Sounds like the government tested this thing and gave it a thumbs-up.

    It doesn’t mean that. The EPA has never tested that filter. The EPA doesn’t test filters at all.

    Here’s the decoder, in plain English — because the EPA runs one system and filter certifications run a completely different one, and the industry is perfectly happy to let you mix them up.

    MCLG — The Health Goal. What Scientists Wish the Number Was.

    MCLG stands for Maximum Contaminant Level Goal. It’s the level of a contaminant in drinking water below which there’s no known or expected health risk — with a margin of safety built in. It’s not a law. Nobody gets fined for exceeding it. It’s the goalpost: where the number should be if health were the only thing that mattered.

    And here’s the number that tells you everything about how this system works: the MCLG for lead is zero. Because there is no safe level of lead exposure — especially for kids and pregnant women. Zero. That’s the health goal.

    MCL — The Legal Limit. What the Law Actually Allows.

    MCL stands for Maximum Contaminant Level. This one is enforceable — it’s the highest level of a contaminant legally allowed in public drinking water. Water systems that exceed it face violations and penalties.

    By law, the EPA must set the MCL “as close to the MCLG as feasible.” Feasible is doing a lot of heavy lifting in that sentence. It means: as close as current treatment technology allows, at a cost the country can actually bear. The gap between the MCLG and the MCL is where science meets economics — and economics usually wins a few rounds.

    So for lead: the health goal is zero, but there’s no MCL for lead at all. Instead the EPA uses an action level of 15 parts per billion under the Lead and Copper Rule — if more than 10% of sampled taps exceed it, the water system has to act. Read that again: the health goal is zero, and the law tolerates up to 15 ppb before it requires action. That gap is exactly why people buy filters.

    The Safe Drinking Water Act, in One Paragraph

    The Safe Drinking Water Act (SDWA), passed in 1974, is the law that gives the EPA authority to set those MCLs and go after water systems that break them. It covers public water systems — roughly, systems serving at least 25 people or 15 connections.

    What it does not cover: your private well. If you’re on well water, the EPA sets no limits for you, tests nothing for you, and sends you no reports. You’re on your own — which is exactly why well owners should read our water testing coverage and test annually.

    Consumer Confidence Reports — Your Water’s Report Card

    If you’re on public water, your utility is required to send you an annual water quality report — the Consumer Confidence Report (CCR) — by July 1st each year. It tells you where your water comes from, which contaminants were detected, how those levels compare to the MCLs, and whether the system had any violations.

    How to read one: skip to the detected-contaminants table, compare each result to its MCL, and pay attention to the footnotes — that’s where violations and explanations hide. Where to get yours: it usually arrives with your water bill or lives on your utility’s website. Lost it? The EPA maintains a CCR search — look up your zip code and read the thing. Most people have never opened theirs. You should be the exception.

    One honest caveat: the CCR tells you what was in the water leaving the treatment plant. It doesn’t tell you what the pipes between the plant and your faucet added — and for lead, those pipes are the whole problem.

    Two Systems, Side by Side — Don’t Mix Them Up

    This is the part that matters most, so let’s make it unmistakable:

    • The EPA regulates your tap water. It sets legal limits (MCLs) for public water systems. It does not test, approve, or certify water filters. Ever.
    • NSF (and other certifiers) test filters. An NSF/ANSI 53 certification means an independent lab verified that a specific filter model actually reduces lead, VOCs, cysts, and the rest. That’s a product claim, proven.

    The EPA writes the speed limit. NSF certifies that your car’s brakes work. You need both ideas in your head at once — and the box that says “meets EPA standards” is hoping you only have one.

    The WQA Gold Seal — The Other Mark You’ll See

    You’ll sometimes see a gold seal instead of the blue NSF mark: the WQA Gold Seal, from the Water Quality Association. Here’s what it is: WQA is the water treatment industry’s trade association, and its Gold Seal program is accredited by ANSI (and Canada’s SCC) to test and certify products to the same NSF/ANSI standards — 42, 53, 58, all of them.

    So a Gold Seal certified to NSF/ANSI 53 means the same thing as an NSF certification to 53: independent testing, same standard, equivalent assurance. Different certifier, same exam.

    One honest footnote, because you deserve it: WQA is the industry’s association certifying the industry’s products. The ANSI accreditation is real and the testing is legitimate — but it’s the industry grading with an accredited proctor in the room, not the government. Read the standard number either way. The number is what matters, not whose logo sits next to it.

    The Weasel Words: “Meets EPA Standards”

    Back to that box. “Meets EPA standards” on a water filter means the manufacturer says their product performs well enough that your water would satisfy EPA limits. The EPA didn’t test it. The EPA didn’t review it. The EPA doesn’t even have a program for that.

    It’s the filter-world cousin of “tested to NSF standards” — a claim graded by the person making it. What you want instead is a certification mark with a standard number: NSF/ANSI 53, or a WQA Gold Seal to NSF/ANSI 53. Certified means somebody independent checked. “Meets EPA standards” means somebody wrote words on a box.

    Don’t Take Anyone’s Word — Including Mine

    Two places to verify everything in this article yourself:

    1. The EPA’s drinking water pages — the actual MCLs, the Lead and Copper Rule, and the CCR search to pull your own water system’s report. Primary source, no middleman.
    2. NSF’s certified-products search at https://listings.nsf.org/certified-products-systems — look up any filter model and see exactly which standards it’s certified to. Two minutes, and it’s the single best defense against fake certification marks.

    The pattern is the same as ever: the people selling you the filter are the last people you should trust about the filter. Check the database. Read your CCR. Know your numbers.

    The Short Version

    You want to know…The answer…
    The level with no health riskMCLG (not enforceable)
    The level that’s actually illegal to exceedMCL (enforceable)
    Why lead’s goal is zero but taps can have 15 ppbMCLG = 0; action level = 15 ppb before systems must act
    Who sets tap water limitsThe EPA, under the Safe Drinking Water Act
    Who certifies that a filter worksNSF or WQA (to NSF/ANSI standards) — not the EPA
    What “meets EPA standards” on a box meansMarketing. The EPA doesn’t certify filters.
    Your water’s annual report cardConsumer Confidence Report, due July 1st

    And whatever the box shouts, read the fine print: “certified” to a numbered standard counts. Everything else is adjectives.

    What I’d buy

    I don’t buy the box — I buy the certification behind the box. The EPA tells me what should be in my water; a numbered certification tells me the filter actually does something about it. Give me NSF/ANSI 53 or a Gold Seal to 53, and show me the database entry. The rest is noise.

    — Steve

  • NSF/ANSI Standards Decoder: What Those Numbers on the Box Actually Mean

    NSF/ANSI Standards Decoder: What Those Numbers on the Box Actually Mean

    You’ve seen the little blue NSF mark on water filter boxes. Maybe you’ve seen numbers next to it — 42, 53, 58 — and wondered if they mean anything.

    They mean everything. Those numbers are the difference between a filter that makes your water taste better and a filter that actually protects your health. And plenty of manufacturers are counting on you not knowing the difference.

    Here’s the decoder, in plain English.

    NSF/ANSI 42 — Taste and Odor. That’s It.

    Standard 42 covers the aesthetic stuff: chlorine taste and smell, particulates, things that make water unpleasant but won’t hurt you. Most pitcher filters and basic faucet mounts carry 42 and nothing else.

    Nothing wrong with 42 — if all you want is better-tasting tap water. But 42 says zero about lead, zero about chemicals, zero about anything that affects your health. A box that shouts “NSF CERTIFIED!” with only 42 behind it is selling you taste, not safety.

    NSF/ANSI 53 — The Health One. This Is the Number That Matters.

    Standard 53 is the heavy hitter. It covers contaminants with actual health effects: lead, mercury, volatile organic compounds (VOCs — the industrial and agricultural chemicals), cysts like giardia and cryptosporidium, and PFAS compounds including PFOA and PFOS.

    If you’ve got a known lead issue, or you’re buying a filter because you’re worried about what’s in your water rather than how it tastes, 53 is the number you need. The CDC itself points to NSF 53-certified filters for lead concerns.

    Here’s the open secret of the industry: 42 is cheap to test for. 53 costs real money and requires real filtration performance. Guess which one most brands stop at — and then put the big blue NSF logo on the box anyway.

    NSF/ANSI 58 — Reverse Osmosis Systems

    Standard 58 covers complete RO systems — tested as a whole unit, membrane plus pre-filters plus post-filters. It covers total dissolved solids and, depending on the specific claims, heavy metals, fluoride, nitrates, and arsenic.

    If you’re buying an RO system, 58 is the certification that says the system works, not just one cartridge in it.

    NSF/ANSI 401 — The New Stuff: Pharmaceuticals and Pesticides

    Standard 401 is the emerging-contaminants standard — trace pharmaceuticals (ibuprofen and the like), herbicides, pesticides, things that aren’t EPA-regulated yet but are showing up in water supplies anyway. If “what else is in there that nobody’s testing for” keeps you up at night, 401 is your number.

    The Supporting Cast

    • NSF/ANSI 44 — water softeners (calcium and magnesium reduction).
    • NSF/ANSI 55 — UV systems for killing microorganisms. Two classes: A handles the dangerous stuff, B handles the merely unpleasant.
    • NSF/ANSI 372 — verifies components are genuinely lead-free.
    • NSF/ANSI 61 — material safety: the filter itself isn’t leaching junk into your water.

    The Weasel Words: “Certified” vs. “Tested To”

    This is the part the marketing departments hope you skip.

    “NSF certified” means an independent lab tested the product and it passed. Real deal.

    “Tested to NSF standards” — or “designed to meet,” “built to exceed” — means the manufacturer ran their own tests and says it would pass. Nobody independent verified a thing. It’s the difference between passing the exam and grading your own paper.

    When you see the weasel words, read the actual standard number. If there isn’t one, there’s a reason.

    Don’t Take Anyone’s Word — Including Mine

    NSF keeps a searchable database of every certified product, by model number and by exactly which contaminants it’s certified to reduce. Before you buy, look the model up yourself. It takes two minutes, and it’s the single best defense against counterfeit marks — which are all over online marketplaces, by the way. A blue NSF logo in a product photo proves nothing. The database entry proves everything.

    Don’t take my word for it — look the product up yourself in NSF’s certified-product search. If it’s not listed there, it isn’t certified, no matter what the box says.

    The Short Version

    You want…Look for…
    Better taste and smellNSF/ANSI 42
    Lead, chemicals, cysts, PFASNSF/ANSI 53
    RO system that actually performsNSF/ANSI 58
    Pharmaceuticals and pesticidesNSF/ANSI 401
    A softener that softensNSF/ANSI 44
    UV that kills the bad stuffNSF/ANSI 55 (Class A)

    And whatever the box shouts, read the fine print: the word is “certified,” or it doesn’t count.

    What I’d buy

    I don’t pick products by the loudest logo — I pick by the standard number behind it. For drinking water at the tap, I want to see 53 on the box at minimum, because taste is nice but health is the point. If a product can’t tell me its standard number, it’s telling me everything I need to know.

    — Steve